VR interactions#
VR Menu#
The VR Menu is a set of runtime tools that can be accessed while playing a simulation in virtual reality and offering design reviews features. The VR Menu can be opened by pressing the menu button on the VR controllers (see controller inputs).
The VR menu contains two tabs: Toolbox and Settings.
Toolbox#

To display the Toolbox tab in VR, open the VR Menu and use the laser to click on the Toolbox tab.
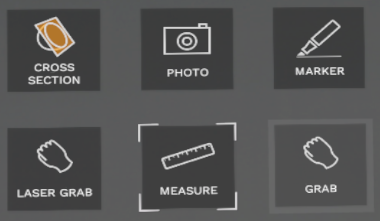
The Toolbox tab contains the following features:
| Tools | Description | |
|---|---|---|
| Cross section |  |
Create a cutting plane attached to the controller. The plan snaps onto the prominent angles, every 45°. |
| Photo |  |
Takes pictures in VR. All screenshots will be stored in the ‘Screenshots’ folder, located in your project folder in the current Working Directory (in the Launcher, select Settings tab and see General>Working Directory). |
| Marker |  |
Draw/write notes in VR. |
| Laser Grab |  |
Allow the user to grab objects from distance. |
| Measure |  |
Measures the distance between two points in space. Display the straight-line distance value and delta values on each axis. |
| Grab |  |
Allow the user to grab objects with the avatar's hands (default tool). |
Settings#


To display the Settings tab in VR, open the VR Menu and use the laser to click on the gear tab.
In the Settings tab you can:
| Setting | Description |
|---|---|
| Navigation Mode See VR navigation below. |
Select your favorite Navigation mode: Teleport: Jumping from one place to another (click joystick), Fly: Go forward or backward in any direction pointed by your controller, Walk: Go forward or backward horizontally in the direction pointed by your controller. In Walk mode, you follow the "ground" altitude (you can climb steps or go to the top floor; you still be above the 3D models you're walking through...), Elevator: Go up or down in the direction pointed by your controller. |
| Start Calibration | To update the size (height) of the avatar according to the current headset-to-ground height. |
Interacting with the menu#
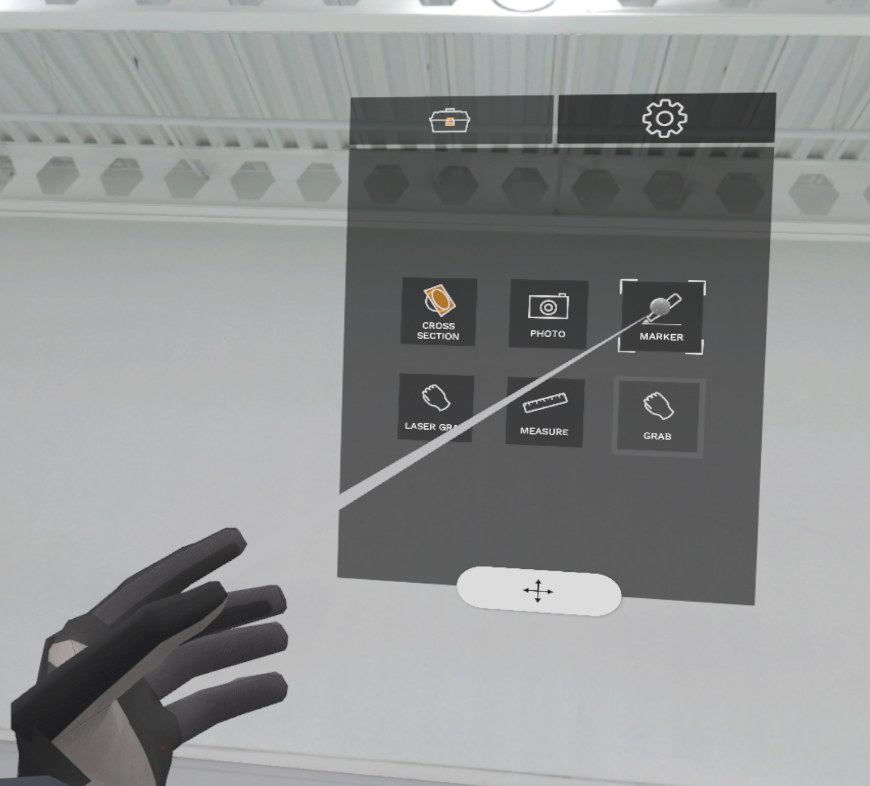
Simply point to an item and click on the trigger using the laser pointer.
Using the bottom button will allow you to move the menu in the scene and place it where you want.
You can switch hands currently using the tools. The other hand can be used to teleport, or retake control of the active feature.
VR Navigation#
There are four navigation modes available when using the VR Player: Teleport, Fly, Walk and Elevator. You can also turn.
Teleport#
Teleport is the default navigation mode when starting the simulation. With Teleport, you jump from one place to another.
To teleport your player:
- Press your controller's button or joystick to throw the teleport laser.
- Point it toward your desired landing spot.
- Use the trigger to teleport to desired spot.
Switch Navigation mode#
To switch from current Navigation mode to an other Navigation mode in runtime:
-
Click the Settings button
(see settings) in the VR Menu to display the Settings Tab, -
Click on the Navigation Mode button to switch from current mode to the next mode (toggle button).
Navigation modes toggled in this order: Teleport (default), Fly, Walk, Elevator, then Teleport again.
Fly#
Go forward or backward in any direction pointed by your controller.
To move in Fly mode:
- Go forward or backward by using your controller's joystick/pad up or down.
- Point your controller in the desired direction. The direction of fly is indicated by the blue arrow.
Walk#
You walk horizontally, respecting the altitude of objects encountered: ground, stairs, platforms, etc.
To move in Walk mode:
- Go forward or backward by using your controller's joystick/pad up or down.
- Point your controller in the desired direction. The direction of walk is indicated by the blue arrow.
- You can slow down by pointing your controller downwards, or upwards to accelerate.
Elevator#
You move vertically.
To move in Elevator mode:
- Go up or down by using your controller's joystick/pad up or down.
- Point your controller in the desired direction, up or down. The direction of elevation is indicated by the blue arrow.
- You can accelerate by pointing your controller up or down, or slow down by pointing your controller forwards.
Turn#
Rotate your avatar to the right or left in 30° increments.
To rotate the Player:
- Use the joystick (push left vs right) or touch pad (click left vs right) of your controller devices.
- Each push or click will rotate the player by 30 degrees.
VR controller bindings#
These are the default bindings for the following controllers:
| Actions | HTC Vive Pro | HTC Vive Focus 3 | Oculus Quest |
|---|---|---|---|
| Grab a part | Trigger | Trigger | Trigger |
| Throw ray to teleport (show/hide) | Thumb pad click | Thumbstick click | Thumbstick click |
| Teleport the Player | Trigger | Trigger | Trigger |
| Move forward or backward in navigation | Thumb pad up/down | Thumbstick scroll up/down | Thumbstick scroll up/down |
| Rotate the Player | Thumb pad left/right | Thumbstick scroll left/right | Thumbstick scroll left/right |
| Open VR Menu | Menu button | Buttons A (right controller) or X (left controller) | Buttons A (right controller) or X (left controller) |
| Select items in VR Menu | Trigger | Trigger | Trigger |
HTC Vive Pro controller#
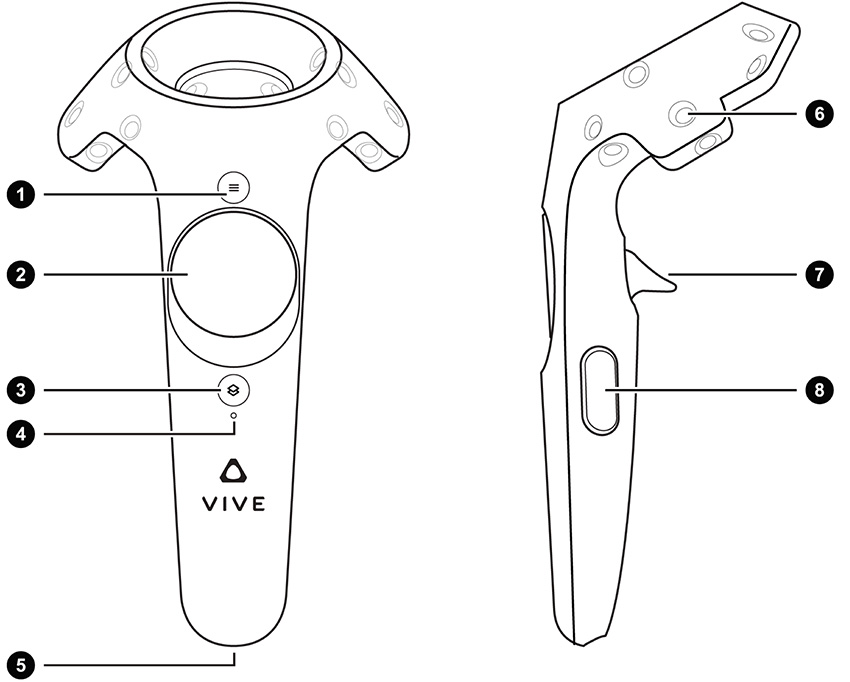
- 1: Menu button
- 2: Thumb pad
- 7: Trigger
- Other buttons are not used by XRTwin.
HTC Vive Focus 3 controllers#
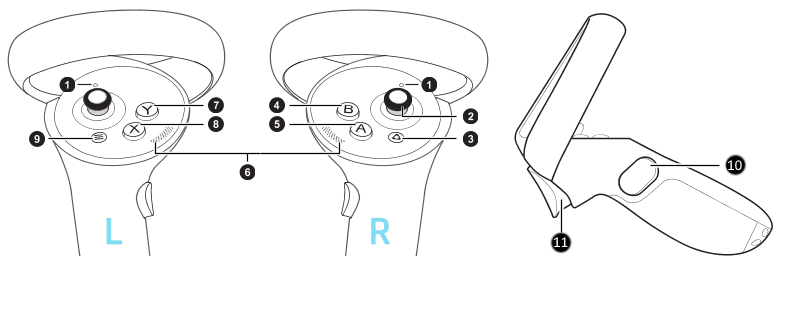
- 2: Thumbsticks
- 5: A button
- 8: X button
- 11: Triggers
- Other buttons are not used by XRTwin.
Oculus Quest controllers#
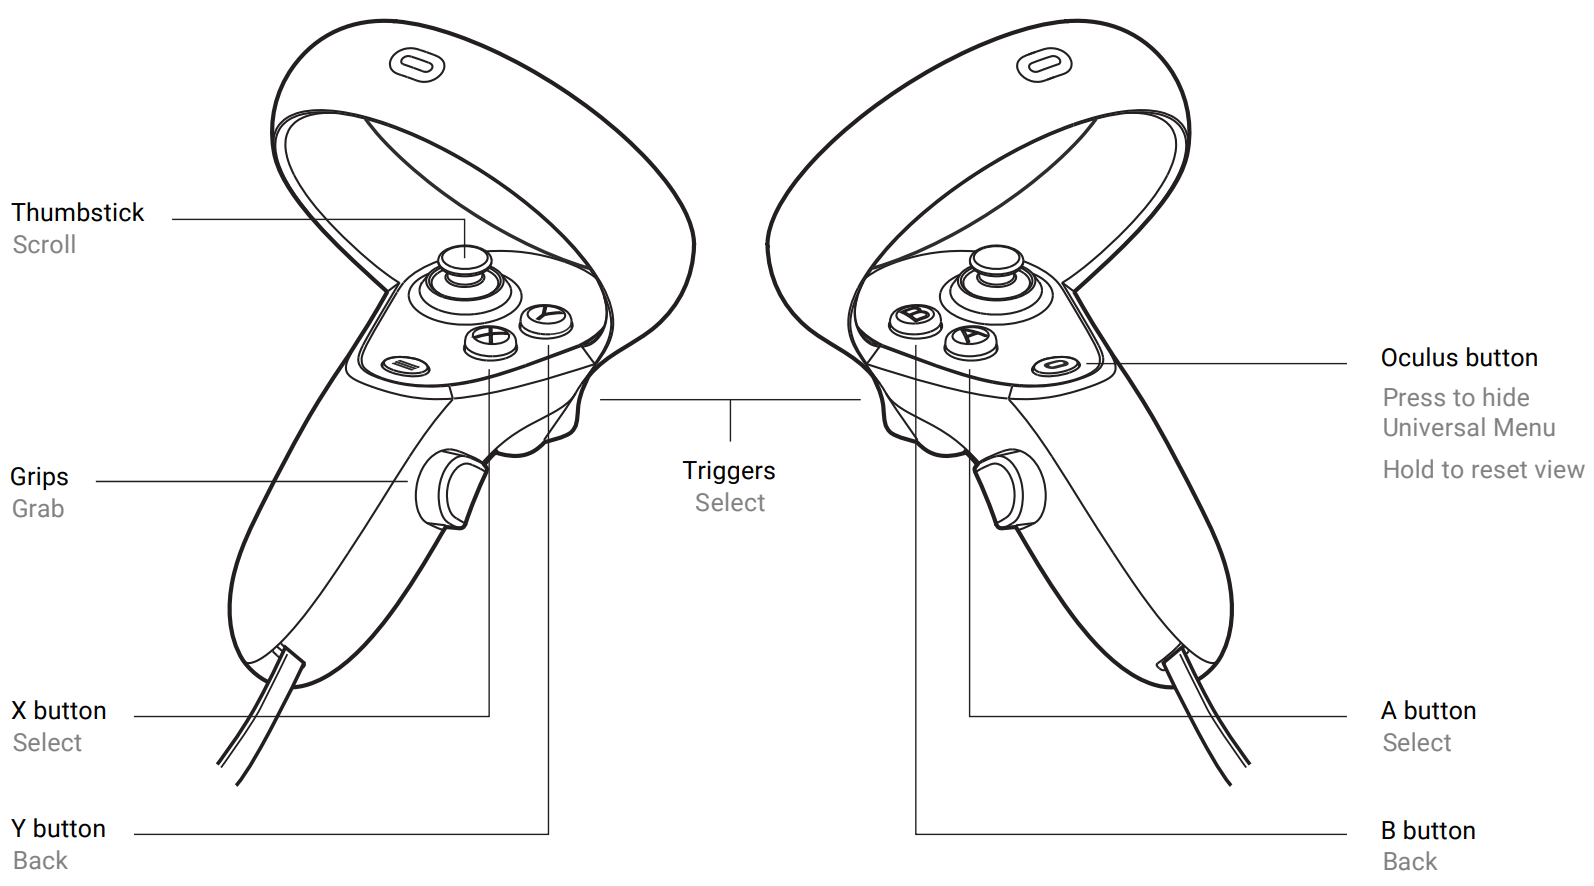
- Thumbstick
- A button
- X button
- Triggers
- Other buttons are not used by XRTwin.