Hardware: Trackers#
VIVE Trackers® and Ultimate Trackers® have been developed by HTC VIVE. Find out more on the manufacturer's website vive.com.
Trackers make it easy to integrate objects into a virtual environment, whether it's a tool, a box or your whole body.
What can I do with Trackers ?#
Three different use cases will involve the use of trackers during XR Twin VR simulations:
| Use case | Solution/Description |
|---|---|
| Body tracking for ergonomics | With the LS Suit, you can track your entire body in VR simulations for ergonomic analysis. See Motion capture and ergonomics. Five trackers will be used. |
| Fingers and hand tracking for dexterity | With a pair of Manus gloves, you can track finger flexion and hand motions in VR simulations. See Hardware: Manus gloves. To localize the gloves in real space, two trackers will be used. |
| Real object tracking to lift them | You can track real objects in virtual simulations, to feel their true weight and inertia and see them move in your VR headset (restrictions). One tracker per object will be used. |
Which trackers to use?#
Depending on your VIVE headset and tracking system, you will use either the VIVE Tracker or the VIVE Ultimate Tracker:
| Your usual VR equipment | Which tracker ? |
|---|---|
VIVE Pro or Vive Pro2 headset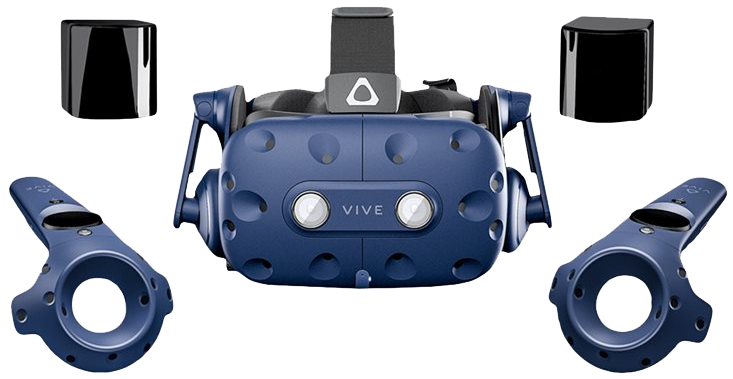 |
If you have a VIVE headset that uses base stations for tracking, you can use VIVE Trackers 3.0.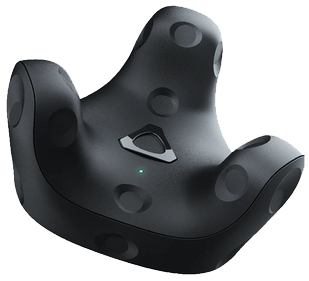 Depending on the use case, you will need to purchase one, two, or five VIVE Trackers, in addition to your usual equipment. You will also need additional accessories, such as a hub for more USB ports and bindings, if required. See VIVE Trackers below. |
VIVE Focus 3, VIVE Vision or VIVE XR Elite headset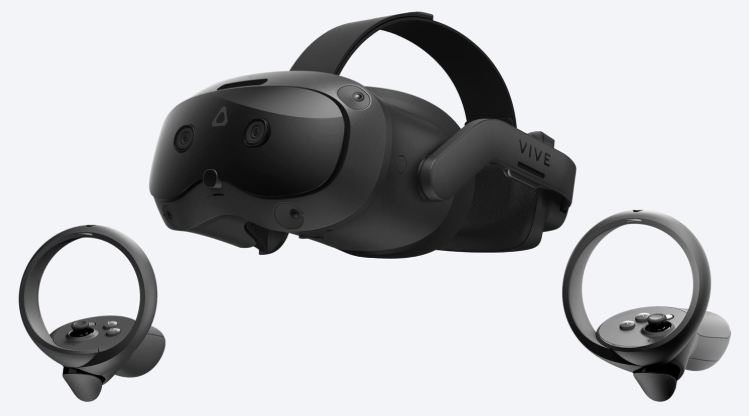 |
If you have a VIVE headset that uses build in camera for tracking, you can use VIVE Ultimate Trackers.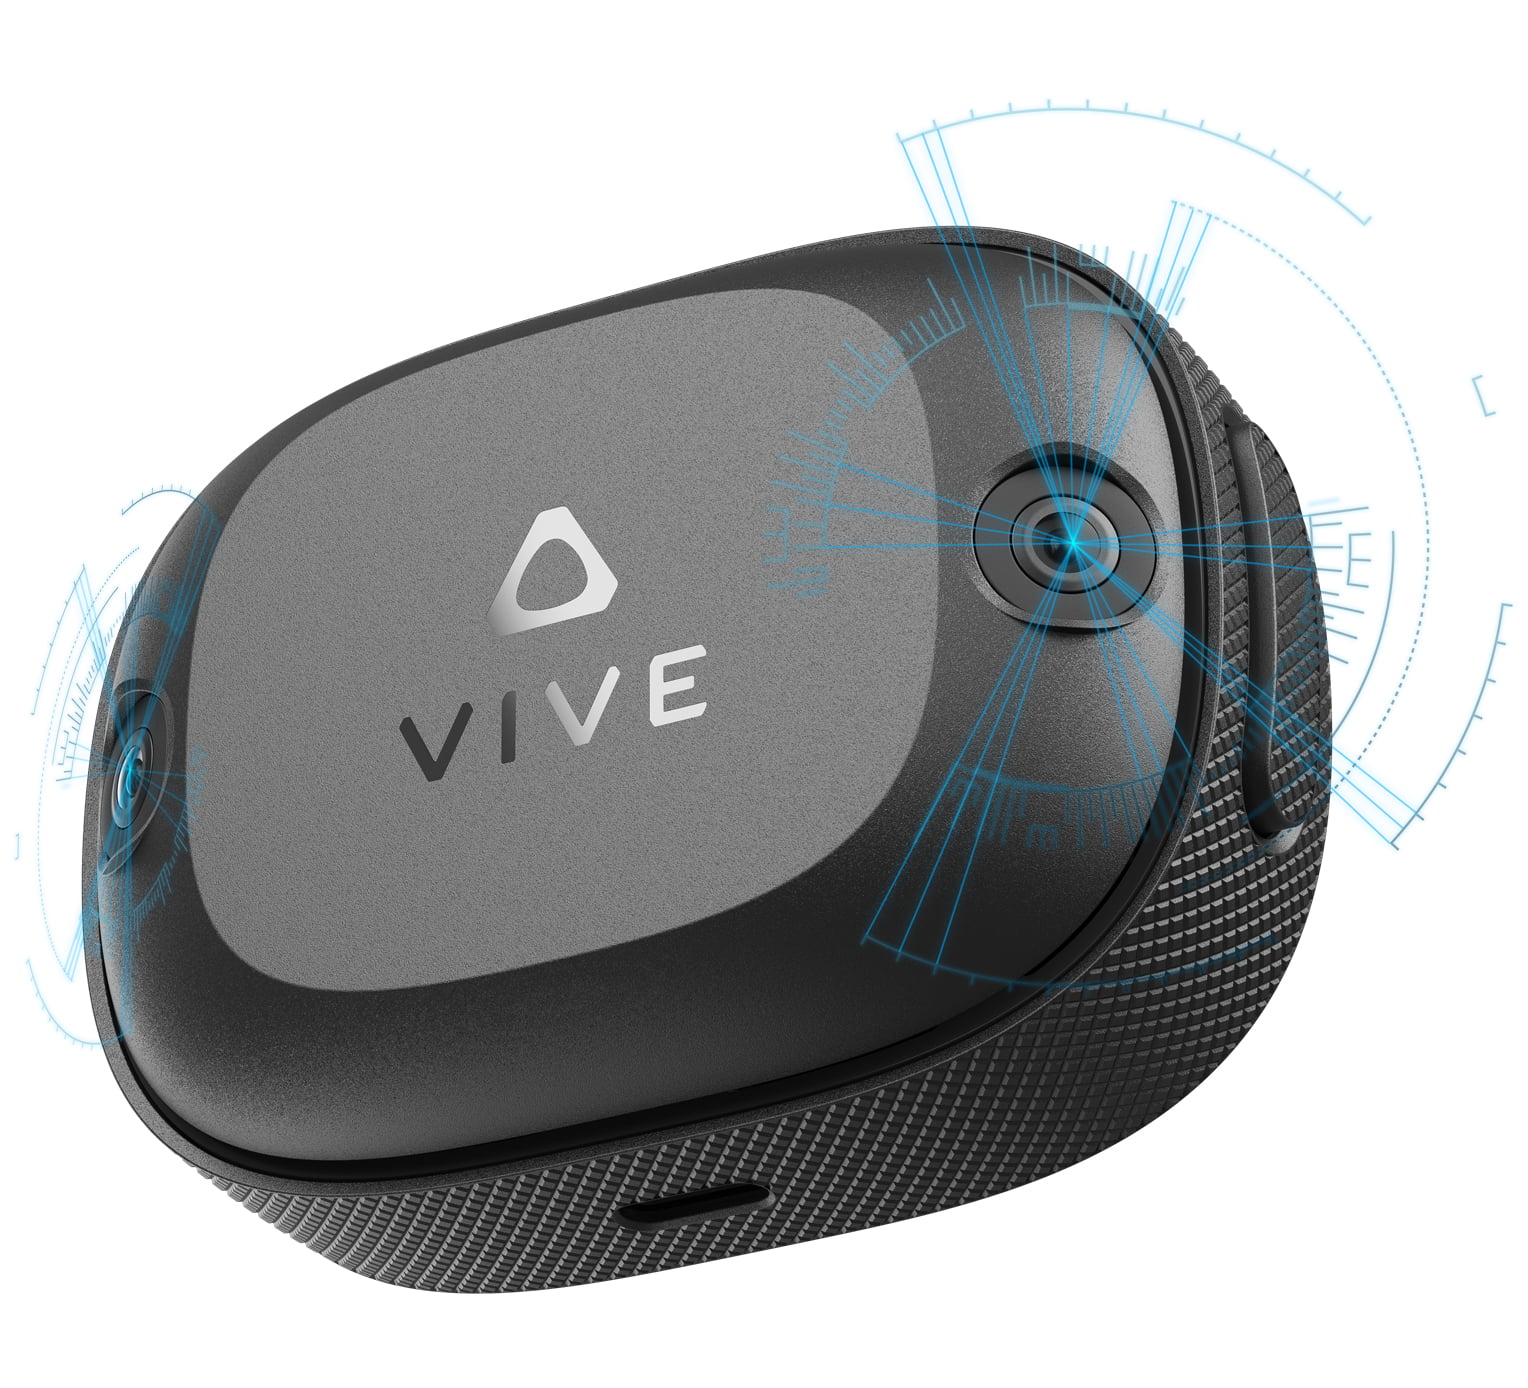 Depending on the use case, you will need to purchase one, two, or five VIVE Ultimate Trackers, in addition to your usual equipment. You will also need a VIVE Wireless Dongle and additional accessories, such as a hub for more USB ports or bindings, if required. See VIVE Ultimate Trackers below. |
VIVE Trackers 3.0#
The first time you install your VIVE Trackers 3.0, you will need to pay close attention to ensure that the correct dongles & roles are assigned. We also recommend that you label your trackers. This will help identify the member who is wearing them. Once properly installed and configured, subsequent setups will be quick and easy.
Prerequisites#
Before installing your trackers, there are a few prerequisites:
- Additional hardware will be available: you will need a USB hub with at least 5 USB type-A ports to plug the 5 VIVE Dongles. Place the 5 VIVE Dongles provided with the VIVE Trackers on the hub, but do NOT plug the hub to the computer and do NOT switch on your trackers immediately (you'll do this in a later step).
- Your VR headset and controllers must be functional:
- The headset is plugged into the PC (you must use an HTC Vive Pro or an HTC Vive Pro2 headset with your Vive trackers 3.0). The Link Box, the Base stations and both Controllers are switched on.
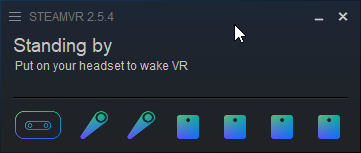
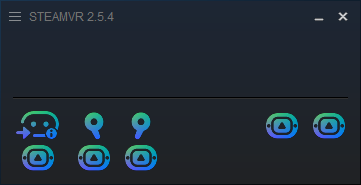
- Open SteamVR app. Check that the correct headset, the 2 controllers and the 2 (or more) base stations are detected (see image below).
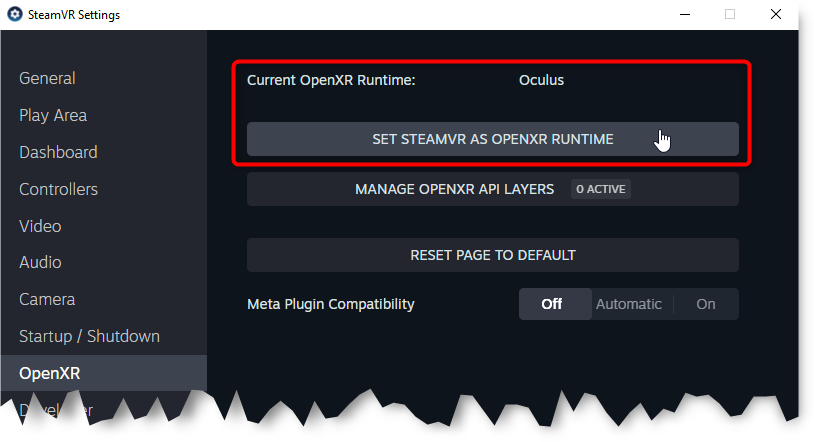
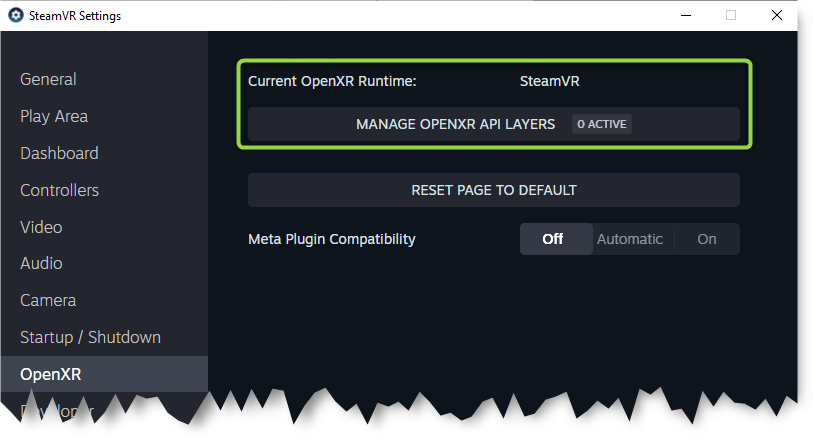
- In the SteamVR menu, go to Settings>OpenXR and check that Current OpenXR Runtime is SteamVR.
If not, click on the SET STEAMVR AS OPENXR RUNTIME button (see both images below).
- The headset is plugged into the PC (you must use an HTC Vive Pro or an HTC Vive Pro2 headset with your Vive trackers 3.0). The Link Box, the Base stations and both Controllers are switched on.
At this stage, your equipment is ready for VR simulation in XR Twin (not yet body motion capture, see LS Suit).
Recommendations#
We recommend that you stick labels on your trackers so that you can easily identify which member they should be attached to.
Installing your VIVE Trackers#
Pair and assign roles#
-
As see above, before you begin make sure that:
-
Both controllers are paired and connected (there LEDs are green).
-
The USB hub is not yet connected.
-
With this situation we make sure that the two available slots on the headset are occupied by the 2 controllers (only 2 devices can pair on the headset, no more), and force the trackers to pair with their own dongles.
-
-
It's time to plug the USB hub to your computer.
-
Turn on the first VIVE Tracker and look at the color of its LED:
-
If LED turns green, it has already been paired with a dongle.
-
If LED remains blue, you need to pair it:
- From SteamVR's menu icon
 .
. - Select Devices.
- Select Pair Controller.
- Follow the instructions to complete the process.
The blue LED flashes, then turns green when pairing is complete. A first tracker icon is added in the SteamVR app interface (see image below).
- From SteamVR's menu icon
-
-
Assign a role to your first tracker:
- From SteamVR menu icon .
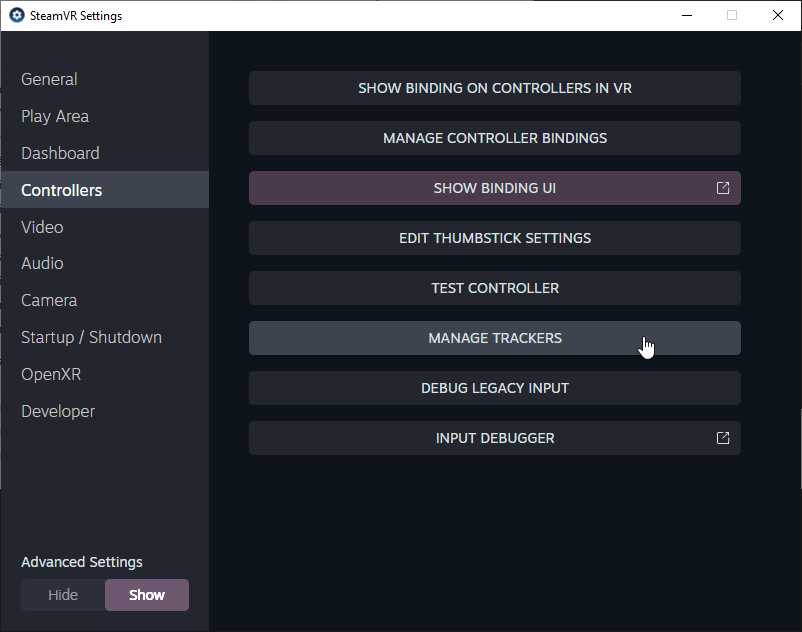
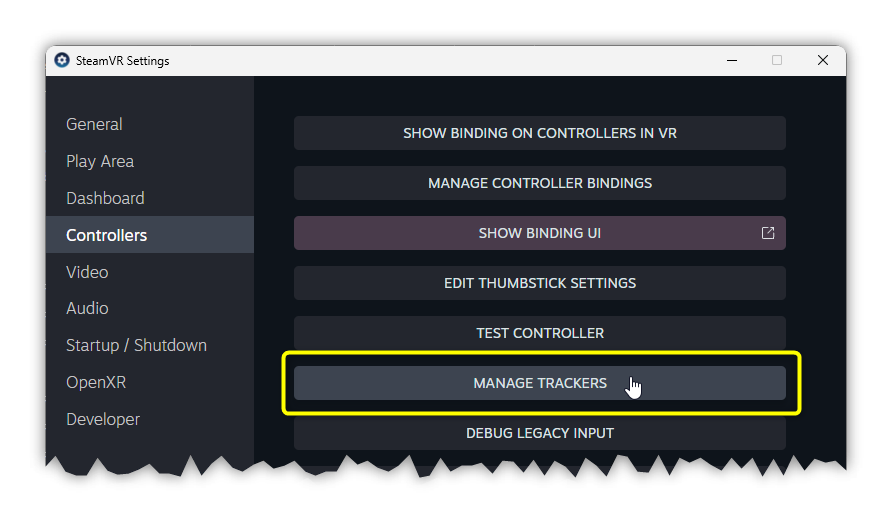
- Select Devices>Manage Trackers to open the SteamVR Settings pop-up (alternatively you can right-click on the tracker icon).
- In the Controllers tab, on the right find and select MANAGE TRACKERS.
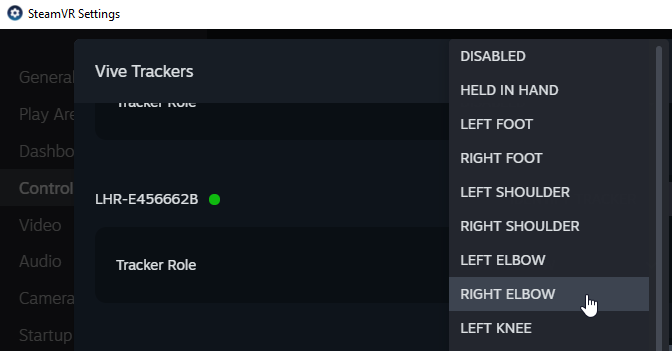
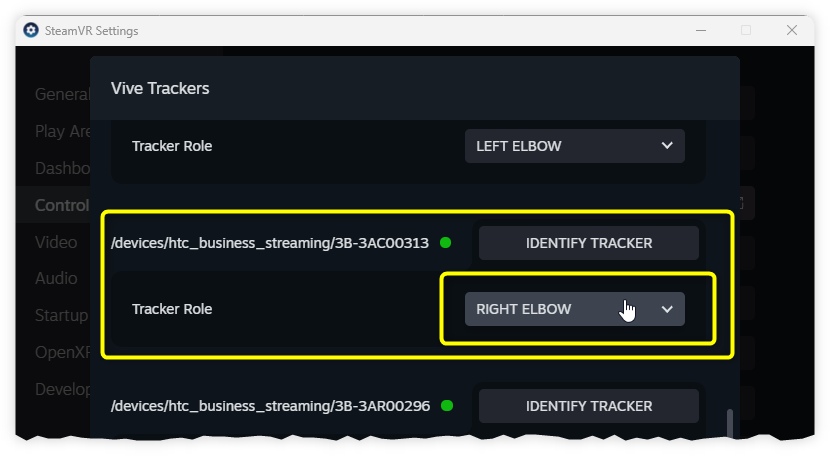
- Below Vive Trackers, all trackers are listed. Scroll to find a green dot like this
 . For this first one, this is the only tracker with a green dot. For the next ones, the only with DISABLE as default role.
 - Just below, on the right of Tracker Role, scroll down the Tracker Role dropdown list and choose the appropriate role (RIGHT ELBOW for the first tracker, in accordance with the tracker number table below).
- The first tracker is set.
- From SteamVR menu icon
-
Repeat the same process for the other 4 trackers, turning on one additional tracker at a time. The roles to be assigned to each new tracker are as follows:
Once your 5 trackers have been paired, they are connected and displayed in SteamVR (see image below).

Install is complete!#
At this stage, your body motion capture hardware equipment is installed, configured and ready for full body simulation in XR Twin.
This is a first-time installation only. The dongles associated with each tracker and their roles are saved in SteamVR's configuration files and will be reused identically each time you start up SteamVR. This way subsequent start-ups will be quick and easy.
You can close SteamVR's Settings then quit SteamVR or continue by starting XR Twin.
Quick Setup for VIVE Trackers 3.0#
Connect and power on#
- Headset is connected. Power on the Link box and the Base Stations (2 or more).
- Power on the controllers needed.
- Open SteamVR.
- Power on the VIVE Trackers 3.0 (in any order)
- Verify all icons are still blue in SteamVR app
Setup is complete!#
Your LS Suit setup with VIVE Pro2 headset and VIVE Trackers 3.0 is complete. You can now launch XR Twin.
VIVE Ultimate Trackers#
VIVE Ultimate Tracker use both VIVE Business Streaming app & SteamVR app and are compatible with this three headsets: VIVE Focus Vision, VIVE XR Elite, VIVE Focus 3, all usable with XR Twin thanks to Steam VR and Open XR.
To learn more about this producs, see www.vive.com .
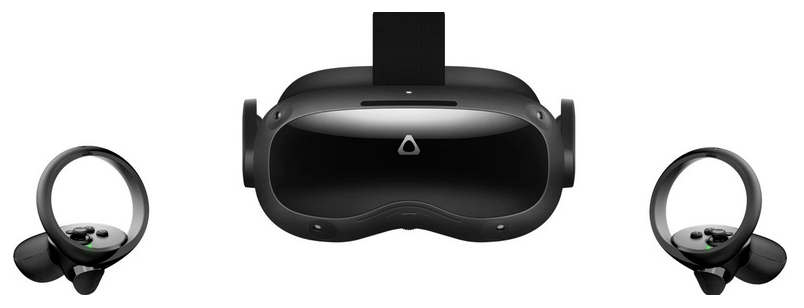
With VIVE Focus 3 headset
For the VIVE Ultimate Tracker installation procedure that follows, we'll be using a Focus 3 headset.
If you are using one of the other two compatible headsets, please refer to the manufacturer's documentation. See vive.com...support.
Prerequisites#
Before installing your VIVE Ultimate Trackers, there are a few prerequisites.
You need:
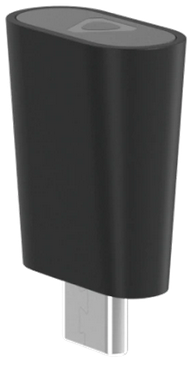
- VIVE Wireless Dongle
to connect your 5 VIVE Ultimate Trackers to the headset.
See vive.com/.../vive-wireless-dongle.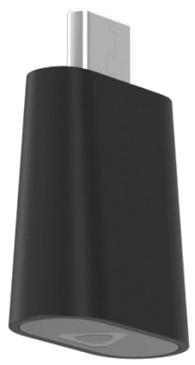
- VIVE Streaming Cable
Depending on your computer, you will need a USB-A to USB-C or USB-C to USB-C cable to connect your headset to your computer. Use a VIVE Wired Streaming Cable or equivalent.
To learn more about streaming with VIVE headsets, see vive-streaming on the manufacturer's website.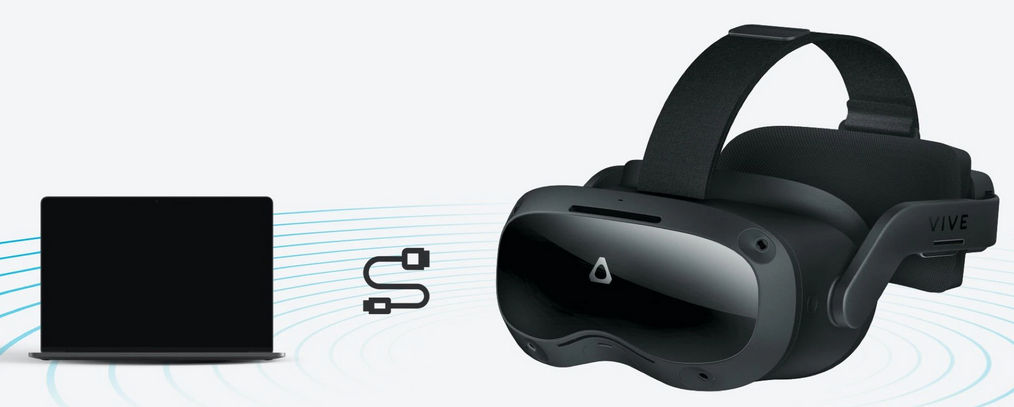
- TrackStraps for VIVE Ultimate Trackers
or similar to fix the tackers on your body (one long for the waist, 4 shorter ones for arms and legs).
See www.vive.com/.../trackstraps .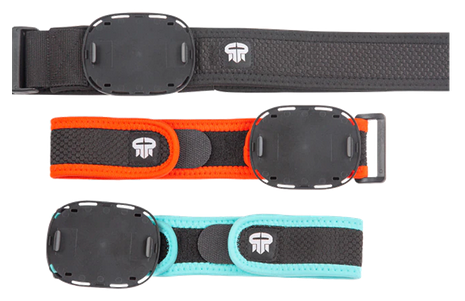
- VIVE Business Streaming app
Already installed to use your VIVE Focus 3 headset. Make sure you always update VIVE Business Streaming when an update is available to get the best streaming performance. For updates, from VIVE Business Streaming app, go to Settings>About>Check for updates. If an update is available, click Install.
For download, see business.vive.com/us/solutions/streaming/. - VIVE Focus 3 headset and controllers
functional and wired, connected to streaming from your computer. See above VIVE Focus installation and setup .
Recommendations#
We recommend that you stick labels on your trackers so that you can easily identify which member they should be attached to.
Install your VIVE Ultimate Trackers#
For VIVE Ultimate Trackers first-installation instructions, follow the setting up process from vive support pages. See vive.com ... support for ultimate trackers.
Here are the main installation steps:
- Connect the VIVE Wireless Dongle to the headset, not to the computer. Use the center-bottom USB-C port of the Focus 3 headset, not the extension cable as shown in the setup guide (you need the lateral USB-C port for cable-streaming).
- Pairing your trackers. See Pairing below.
- Assigning roles. See Assigning roles below.
- Update firmware if requested.
Pairing#
You can pair your trackers in VR with your VIVE Focus 3 headset. For other methods, see business.vive.com/.../setting-up-vive-ultimate-tracker.html.
Labelling your trackers
As recommended above, it is easier to give your trackers some labels. The first step is to give them a number from 1 to 5.
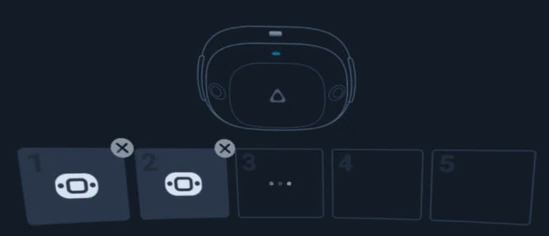
To pair your trackers in VR:
- Go to your play area and put on your headset. Take your controllers when required. When Choose USB mode panel is displayed, select Take no action.
- From VIVE Lobby, select Settings>Inputs>Motion trackers>Pair new/Pair.
- Pick up the tracker with label "1" and press the power button to turn it on.
- Press and hold the power button for two seconds to enter pairing mode. The status LED will start flashing blue.
- Once VIVE Ultimate Tracker is paired and connected, a tracker icon will appear in one of the slots. You can pair up your five trackers at a time. We recommend that you proceed in the order of the numbered labels, from 1 to 5.
- After you're done pairing your 5 trackers, select Done.
Scan your play area#
If you use your headset in a new place, you will be automatically prompted to create a new boundary for your play area. When prompted, you'll be guided to scan your play area. The scan map will be used by both headset and trackers.
To scan your playing area:
- You're still wearing your VIVE Focus 3 headset.
- Select Start scan.
- Follow the onscreen instructions to scan your area.
- When prompted, check the trackers blue labels are not drifting.
Important key points
Make sure you're in the center of your play area before you select Start scan.
Make sure you're kneeling down throughout the scanning process.
Assigning roles#
The motion tracker role is the part of your body to witch VIVE Ultimate Tracker is attached to. You can assign roles in the headset or via SteamVR. You can also do this via VIVE Manager (for this method, see vive.com...Assigning motion tracker roles via VIVE Manager).
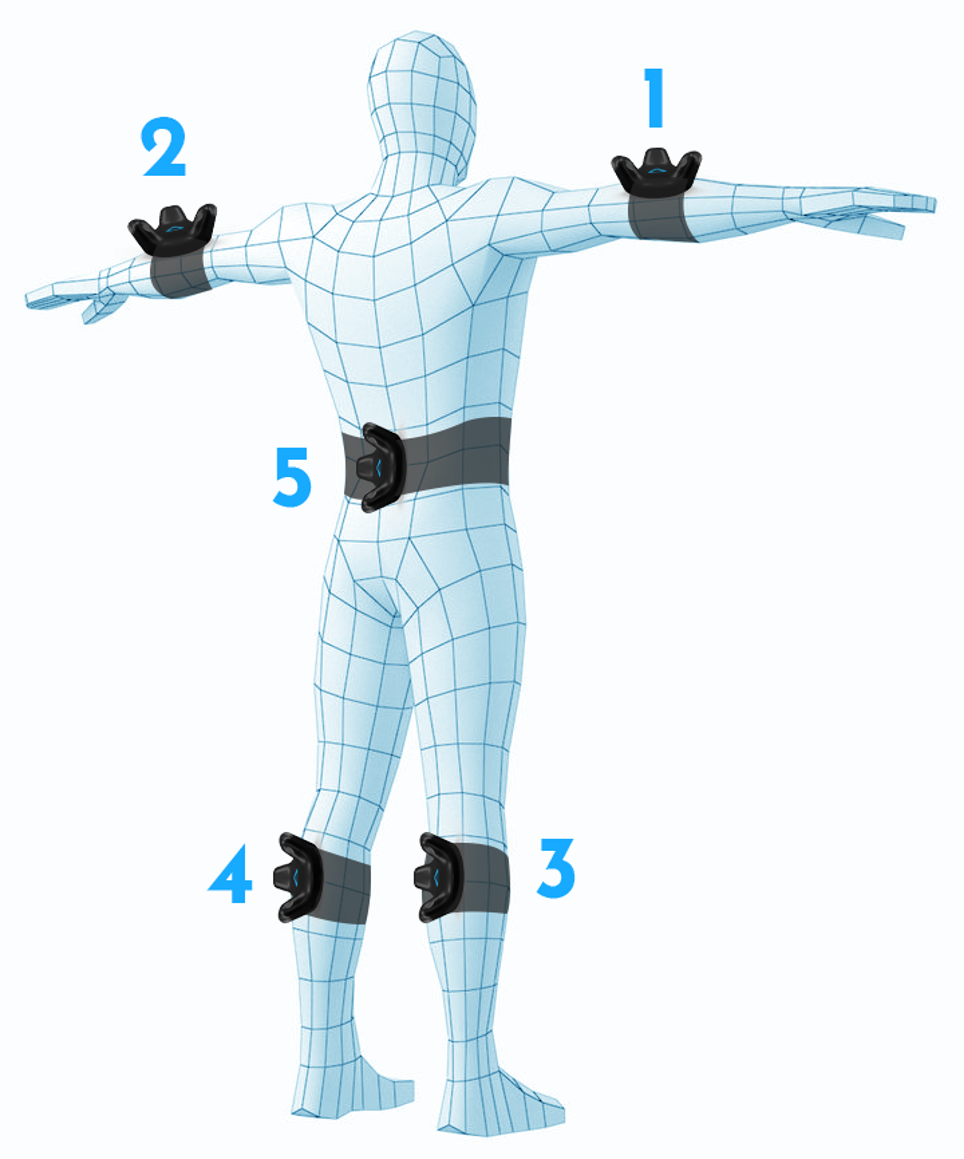
Here are the roles to assign to each of the five trackers used with what we call the "LS Suit":
To assign motion tracker roles to your VIVE Ultimate Trackers in VR:
Important: Trackers on and connected
Ensure that the trackers are turned on and connected. The status LEDs should be green.
They are programmed to turn off (go to sleep) when not in use.
- In your VIVE Focus 3 headset, go to Settings>Inputs>Motion trackers.
- Select the tracker you want to assign a role to.
- Under Type, click on
 to use the tracker for body tracking. Choose where you're planning to place the tracker on the body.
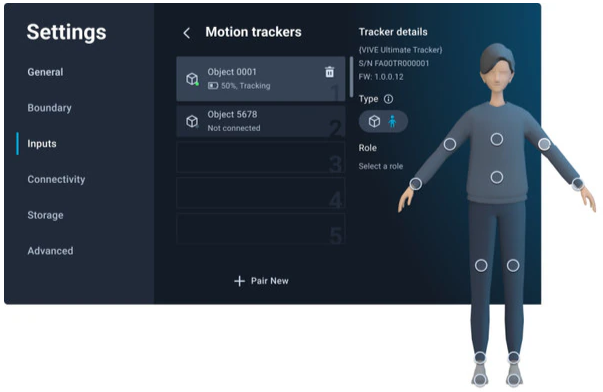
- Do this for all 5 trackers.
To assign roles to your VIVE Ultimate Trackers via SteamVR:
Alternatively, instead of assigning roles in the VR headset, it's possible to assign roles via SteamVR. Following these steps:
- Open SteamVR app. VIVE Ultimate Tracker icons are displayed.
- Click on SteamVR menu icon > Devices>Manage Trackers to open the SteamVR Settings pop-up (alternatively, you can right-click on the tracker icon and select Manage Trackers).
- Locate and click MANAGE TRACKERS on the right side of the Controllers tab. Vive Trackers page opens.
- The Vive Tracker page lists all trackers.
- Scroll to find the first green dot like this .
- Click the IDENTIFY TRACKER button. The Tracker green LED will flash.
- Select the role: to the right of Tracker Role, scroll down the list and select the appropriate role according to the tracker destination (see Tracker Rules table above).
- Your first tracker is set.
- Repeat the same process for the other 4 trackers, identifying one tracker at a time.
Install is complete !#
At this stage, your body motion capture hardware equipment is installed and ready for full body simulation in XR Twin.
This is a first-time installation only. All setup parameters are stored in VIVE Business Streaming and SteamVR's configuration files and are reused identically each time you start up the VIVE Business Streaming and SteamVR apps. This makes subsequent startups quick and easy.
The VIVE Ultimate Trackers installation is now complete and you can close the SteamVR settings, quit SteamVR and the VIVE hub.
Quick setup your VIVE Ultimate Trackers#
If installed correctly the first time, here is how to quickly set up VIVE Ultimate Trackers with Focus 3 headset:
Prerequisites#
- Charge the batteries of the headset, both controllers and the 5 trackers (the charger should have an output of at least 10 watts),
- Connect the USB-C end of your cable to the Focus 3 headset. Connect the other end of the cable to your computer (USB-C or USB-A, depending your computers' output).
- From the computer, open VIVE Business Streaming app.

Power on your hardware#
- Power on the five VIVE Ultimate Trackers (press the power button for 1 second).
- Power on your Focus 3 headset (press the power button for 3 seconds).
- Put on your Focus 3 headset.
Connect the streaming#
From your Focus 3 headset, follow the instructions:
- Take your controllers and turn them on (they will wake up if they are in standby mode).
- From Choose USB mode panel, select VIVE Business Streaming.
Alternatively, for example if you want to check settings or your VIVE Ultimate Trackers, select Take no action. See below how to Connect VIVE Business Streaming from the VIVE Lobby to come back here and continue this setup..
New play area?#
- If you use your headset in a new place, you will be automatically prompted to create a new boundary for your play area and/or scan it to update the play area tracking map.
- Follow the instructions.
SteamVR#
-
SteamVR will open automatically when you connect to VIVE Business Streaming.
-
You are now in the SteamVR dark waiting space (dark, with white circles on the ground and in the sky).
-
On the computer, in the SteamVR app, all devices are now detected and displayed solid blue.
Wear your trackers#
- Place the VIVE Ultimate Trackers (the straps) on your body according to their label numbers and assigned roles. Please respect these positions:
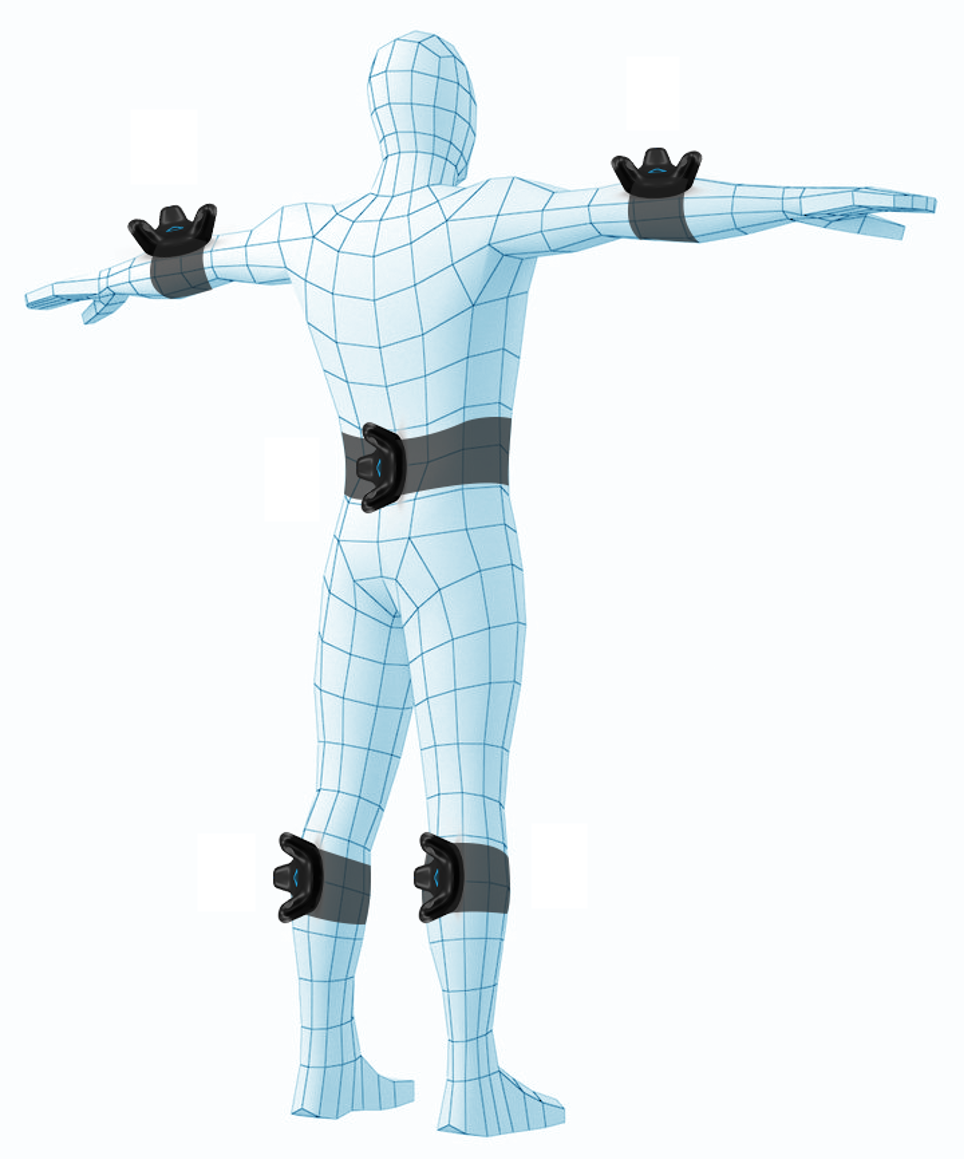
- Two straps on the forearms, 5 cm after the elbows. With your palms pointing downwards in T-pose, the trackers should be pointing upwards.
- Two straps on the legs, 5 cm below the knees, with the trackers facing backwards.
- And the 5th strap on the belt, with the tracker facing backwards.
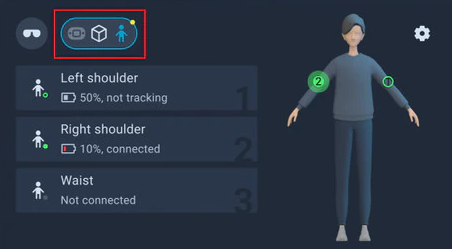
- You can see your VIVE Trackers in the VIVE Focus 3 headset. Double-click the VIVE button on the right controller to activate passthrough: blue labels identify each tracker, numbered 1 to 5. This can help you check the tracking.
- If something goes wrong, consult vive.com/.../support/ultimate-tracker/ for Solutions and FAQs.
Setup is complete!#
Your LS Suit preparation with VIVE Focus 3 headset and VIVE Ultimate Trackers is complete. You can now launch XR Twin.
Tips#
Connecting VIVE Business Streaming from the VIVE Lobby:#
If you have been through the VIVE Lobby (for example when for Choose USB mode panel you've selected Take no action and not VIVE Business Streaming), then you are now in the funky colored VIVE Lobby.
If not, you are in an application. Press the VIVE button on the right controller to display the VIVE menu, click Recent on the far left, then on the main panel click Back to Lobby to disconnect the streaming and go back to the VIVE Lobby.
To resume setup from VIVE Lobby:
- From the VIVE Lobby's flat menu bar, select Library,
- From the VIVE Lobby's menu main panel, scroll to find VIVE Business Steaming and click to launch,
- You are now in the SteamVR dark waiting space (dark, with white circles on the ground, sometimes with stars in the sky).
- To continue your setup, go to step "Wear your trackers" just above.
Checking tracker status in the VIVE Menu#
While in VR, you can check the status of your Tracker in the VIVE Menu.
- Press the VIVE button on the right controller to display the VIVE menu.
- Select Devices.
- Select the tracker button at the top of the VIVE Menu.
Update firmware regularly#
Important: Trackers on and connected
Make sure that the trackers that you want to update are turned on and that they are paired with your headset. The status LEDs are green. They are programmed to turn off (go to sleep) when not in use.
- In your headset, from the Lobby menu, go to Settings > Inputs > Motion trackers.
- Select Firmware update in the lower right.
- Select Start update.
Verify that SteamVR is the current OpenXR Runtime#
From SteamVR menu >Settings>OpenXR, check that SteamVR is still the Current OpenXR Runtime. If not, click the SET STEAMVR AS OPENXR RUNTIME button.
Why ?
If you always use the same headset, this does not apply to you. On the other hand, if you're using several different devices, it's possible that each will become the current OpenXR Runtime in turn. To use VIVE Ultimate Trackers, check that SteamVR is the current OpenXR runtime.
Troubleshoutings#
If something goes wrong, consult the Solutions and FAQs section, here vive.com/ ultimate-trackers Solutions and FAQs for general or tracking tips about VIVE Ultimate Trackers, and here vive.com...support/VIVE Focus 3 for VIVE Focus 3. Adapt if you use other headsets. The support pages on the various VIVE websites are packed with detailed procedures and tips.
- For Error Codes concerning VIVE Business Streaming (or vbs) app, see vbs error codes.
- In SteamVR app, from Settings>Startup>Shutdown tab>MANAGE ADD-ONS,
- Add-on "htc-business_streaming" must be "On".
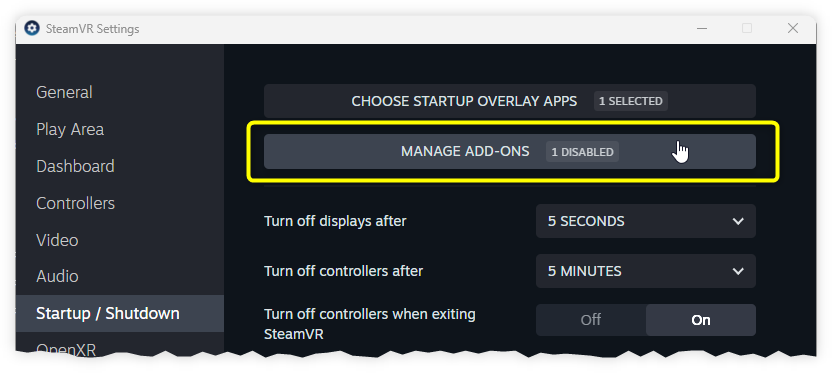
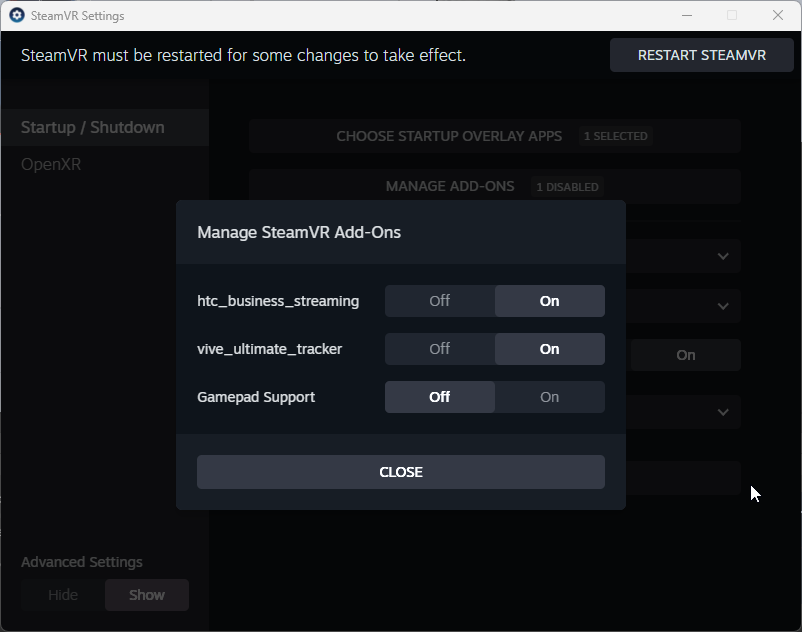
- Add-on "htc-business_streaming" must be "On".
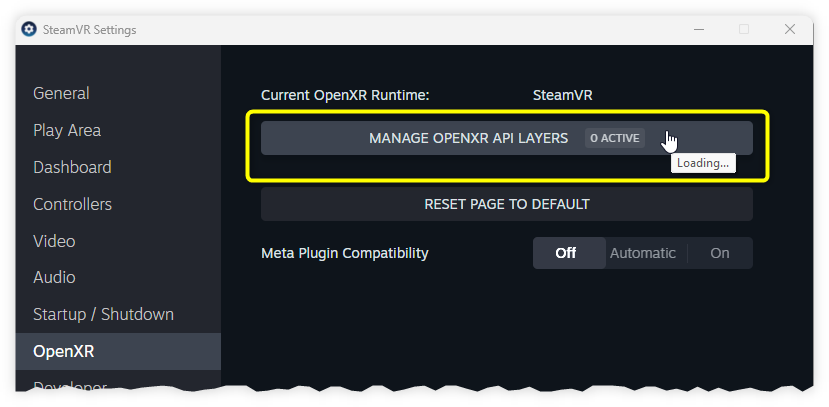
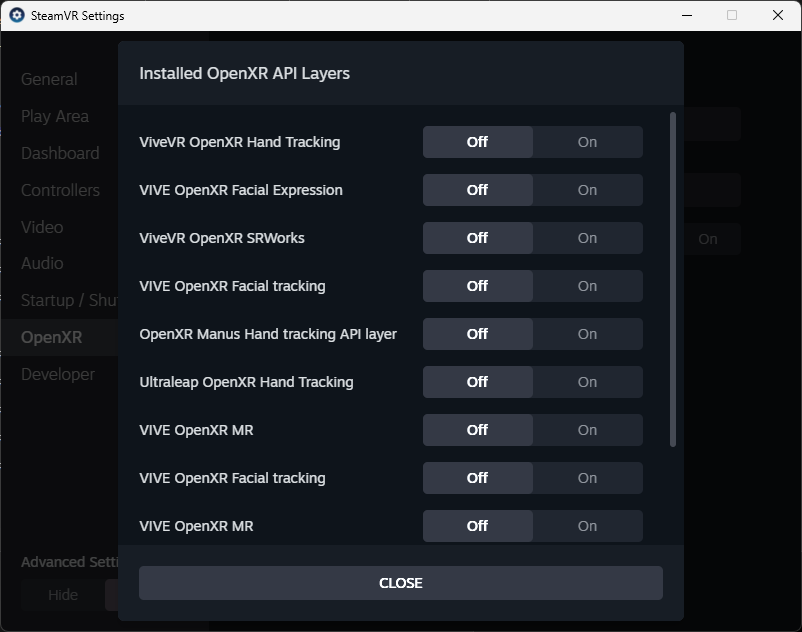
- In SteamVR app, from Settings>OpenXR>MANAGE OPENXR API LAYERS, set all "Off".
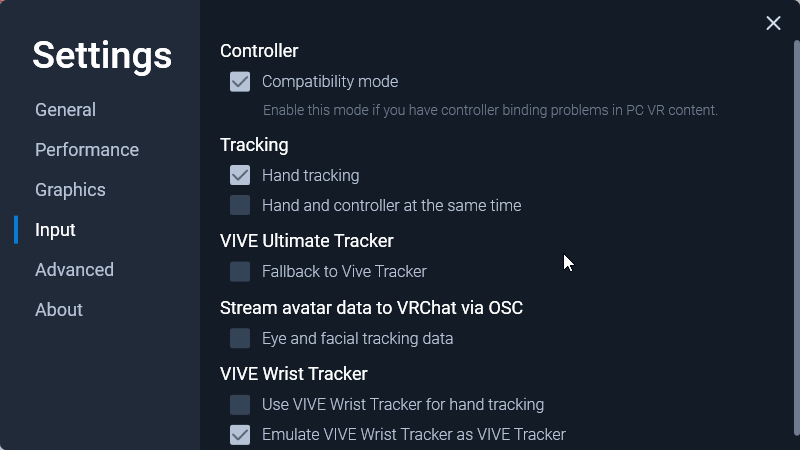
- In VIVE Business Streaming app, from Settings>Input,
- Under Tracking, check Hand tracking if you want to use your hands. See image below. If you never use hand tracking, you can leave it unchecked.
- Under VIVE Ultimate Tracker, lets Fallback to Vive Tracker unchecked.
- Under Stream avatar data..., you can uncheck Eye and facial tracking data, not used by XR Twin.