Hardware: Headsets#
XR Twin is compatible with a wide range of VR headsets, giving users flexibility and choice in their VR experience. Some popular VR headsets primo-installation are described in the following sections of this page. They are all compatible with XR Twin. Click on the links below for quick access.
Headsets for VR experience#
| Manufacturer | Headset model(s) | Controllers | Hand Tracking | MR Passthrough |
|---|---|---|---|---|
| VIVE | VIVE Pro, VIVE Pro2 | Yes | No | No |
| VIVE | VIVE Focus | Yes | Yes | Yes |
| Oculus | Oculus Rift series, Oculus Rift (S) | Yes | No | No |
| Meta Quest | Meta Quest 1, Meta Quest 2, Meta Quest 3 | Yes | Yes | No |
| Apple | Apple Vision Pro | No | Yes | Yes |
| Pico | Pico 4 | Yes | Yes | No |
| Varjo | Varjo XR-3, Varjo XR-4 | Yes | Yes | Yes |
| Others | Windows Mixed Reality | Yes | No | No |
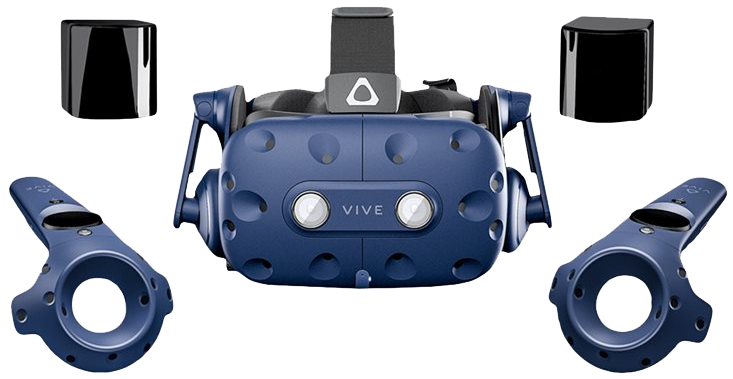
VIVE Pro#
Known for their high-quality visuals and immersive experiences, the VIVE Pro® and VIVE Pro2® offer precise tracking and comfortable design for extended VR sessions. Both use base stations with an infrared laser tracking system. SteamVR application required.
To learn more about VIVE Pro products: vive.com pro series.
Install VIVE Pro#
For VIVE Pro or VIVE Pro2 first-installation instructions, see vive.com support.
Setup VIVE Pro#
If you installed it correctly the first time, here is how to quickly set up VIVE Pro or VIVE Pro2:
Connect#
- Connect the Link Box to your computer.
- Connect the headset cable to the Link Box.
- Supply the Base Stations (2 mini, 8 maxi).
Switch on#
- Switch on the Link Box
- Switch on both Controllers.
SteamVR#
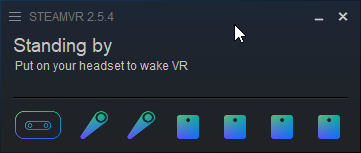
- From the computer, open SteamVR app.
- Check that all devices are detected: device LED's are green and respective icons are full blue in SteamVR's window.
-
From the SteamVR menu select Settings>OpenXR and check that Current OpenXR Runtime is still SteamVR (only if an other Runtime was used).
-
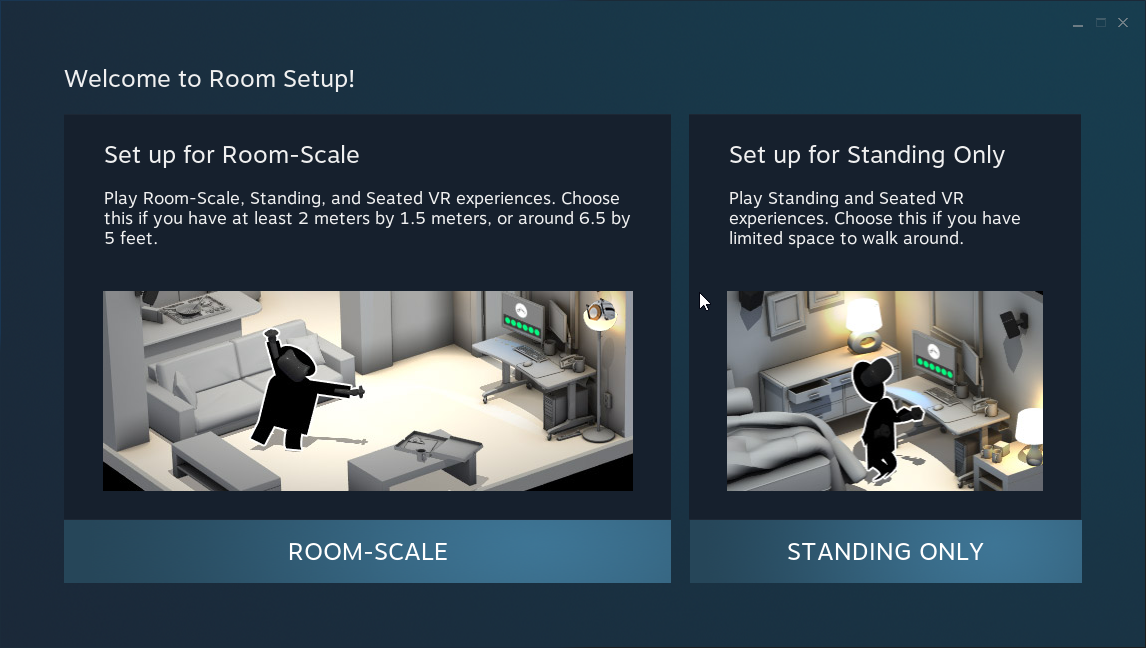
From SteamVR menu>Room Setting proceed room calibration (only if Base Stations have moved).
Check#
- Headset installation is now complete. To check, put on your headset: you are in the SteamVR's waiting space (under a starry sky or a dark scene with white circles on the ground and in the sky) and you can see the ghosts of your devices.
Tips for VIVE Pro#
- Use a VR+VRControllers User.
- Press Menu button on left or right controller to open XRTwin's VR Menu.
VIVE Focus#
Known for its high-quality visuals and immersive experiences, the VIVE Focus series offer precise tracking and comfortable design for extended VR sessions. The VIVE Focus® can be used connected to the computer or wireless (using VIVE Hub), alone for VR sessions or with VIVE Ultimate Trackers for Full Body ergonomics. SteamVR and VIVE Hub/VIVE Streaming applications required.
To learn more about VIVE Focus products: vive.com/us/product/#focus%20series
For VR sessions with XR Twin you will need:
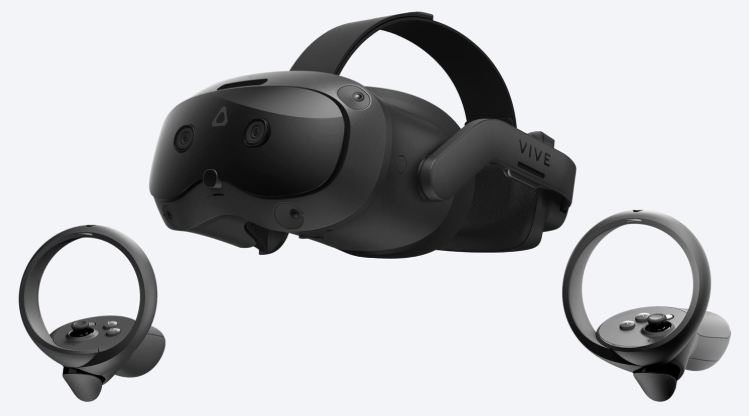
- VIVE Focus 3 or VIVE Focus Vision headset.
- VIVE Hub app with VIVE Steaming services and SteamVR app installed on the computer.
- HTC account. If you don't have one, you will be prompted to create one during the Focus Vision setup process.
- To connect the headset to a Wi-Fi network, it is highly recommended that you use a high-end, dedicated Wi-Fi router.
- For the best wired PC VR streaming experience, HTC VIVE recommend using the VIVE Wired Streaming Kit with VIVE Focus Vision. See vive.com/us/accessory/.
Install VIVE Focus#
For first-installation instructions and depending on your headset, see support/focus3/ or support/focusvision/ on vive.com support web site.
1- Install VIVE Hub#
Download here and install VIVE Hub. When asked, install VIVE Streaming and VIVE Ultimate Trackers [Optional, only if you are going to use them]. VIVE Streaming services are embedded in VIVE Hub. For manufacturer's recommendations, complete instructions and troubleshooting with VIVE Streaming, see vive.com/us/support/vs and How do I make VIVE Streaming communicate through Windows Defender Firewall?.
2- Install SteamVR#
Install SteamVR. Use offline version (recommended) or download online version from Steam web site here (Steam account needed). Then launch it first time to complete the installation.
3- Install VIVE Focus Vision#
Set up your VIVE Focus Vision first time to complete the installation. For help, visit vive.com/us/setup/vive-focus-vision and vive.com/us/setup/vive-focus-vision/vr-setup. For connection instructions and diagnostics, open Settings![]() > Setup Guide from the VIVE Hub dashboard and follow instructions.
> Setup Guide from the VIVE Hub dashboard and follow instructions.
To learn more about Focus Vision, see Tips for Focus sections below.
Setup VIVE Focus#
Your headset was installed completely the very first time. For subsequent setups, here’s how to quickly get your Focus headset up and running, using wired or wireless connection. You can also use hand tracking or MR passthrough:
Wired connection#
When connecting your headset to your computer using a cable:
- Start computer and launch VIVE Hub and SteamVR.
- Connect the headset to the computer. You need a USB-C 3.2 cable that supports a minimum of 5 GBs.
- Turn on your Focus headset (press the power button for 4-5 seconds) and put it on.
- If you use your headset in a new place, you will be automatically prompted to create a new boundary for your play area (or to scan your environment if using VIVE Ultimate trackers). Follow the head-on instructions.
- Start streaming. Depending on the context,
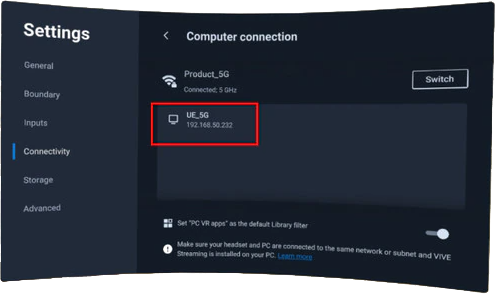
- First time you stream, in Choose USB mode popup window select Take no action. Go to Settings > Connectivity > Computer connection and select your computer. When streaming in the future, select VIVE Streaming. If any issues, try disconnect / reconnect USB cable to force Choose USB mode window to pop again.
- If not connected, select Library in the VIVE menu. In PC VR apps window, click the blue Connect Computer button. In Computer connection window, wait while connecting, then click VIVE Hub PC or similar.
- If connected, PC VR apps window is displayed. Click the blue Connect Computer button, then the SteamVR thumbnail.
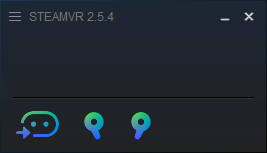
Your VR setup with VIVE Focus headset and both controllers is now complete, and you are now waiting for XR Twin simulation under the SteamVR stellar dome. In VIVE Hub or VIVE Business Streaming app, streaming is active and connection quality is indicated (green for "good", see image below). In SteamVR, your devices are detected and displayed in solid blue (see image below). For complete instructions, visit vive.com: howto connecting headset to computer cable and vive.com: howto connecting vive focus to pc using vive wired streaming kit. If something goes wrong, see Troubleshootings with Focus below.

Wireless connection#
When connecting your headset to your computer using a Wi-Fi network, use a dedicated router (Wi-Fi 6+ recommended). Connect your computer directly to your router using an Ethernet cable. Configure your corresponding Ethernet and Wi-Fi connections so that both VIVE Focus and computer share the same network.
- Start computer and launch VIVE Hub.
- Put on your headset. From the VIVE Menu, go to Settings > Connectivity > Wi-Fi and select the router network.
- Go to Settings > Connectivity > Computer connection, wait while connecting then select your computer. (Pair headset requested only during the first connection).
- In the VIVE Menu, select Library (depending on the context, you will need to close the Computer connection page) and click SteamVR App thumbnail to start the streaming.
You are now waiting for XR Twin simulation under the SteamVR stellar dome. For manufacturer's recommendations, complete instructions and troubleshooting, visit vive.com[...]connecting-headset-to-computer-wireless.
Enable Hand Tracking#
To enable Focus Vision's hand tracking, go to Settings > Inputs and turn on Hand tracking. If this option is turned off, you will need to use the controllers.
When setup is complete and headset connected, you can open your XR Twin project and start VR simulations.
MR passthrough with Focus#
In your XR Twin VR simulation, you can cut out the background to see your scene objects in front of your real-life surroundings. This is known as MR Passthrough in the VIVE vocabulary.
In VIVE Hub:
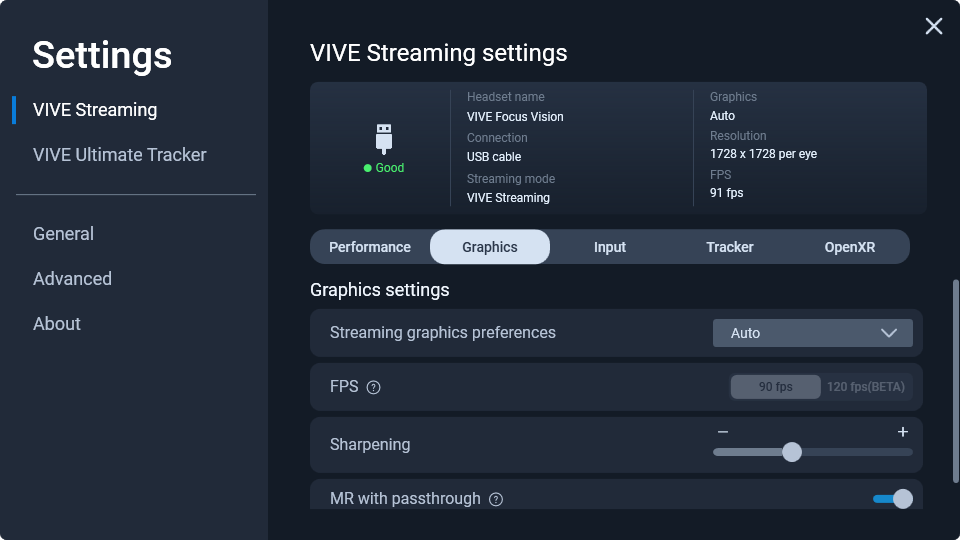
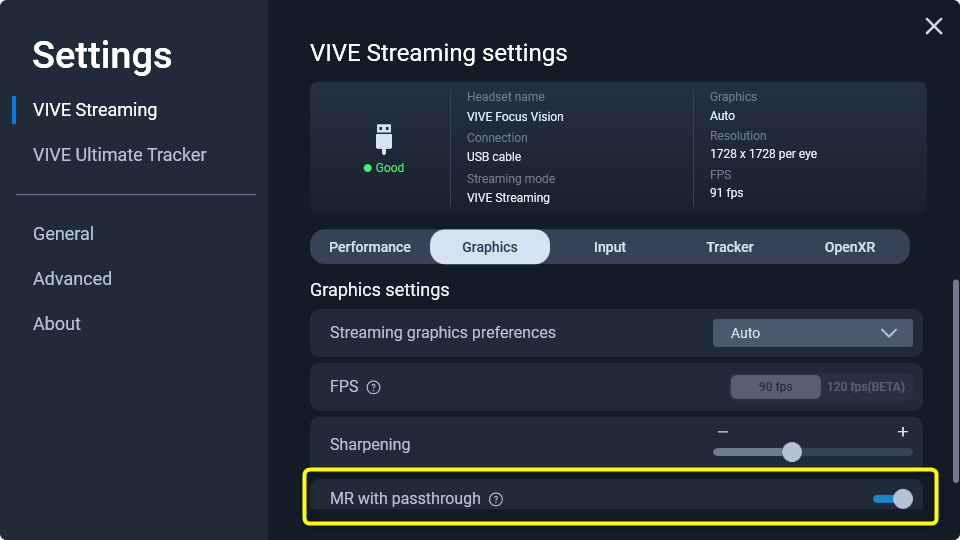
- Go to
 Settings > VIVE Settings > VIVE Streaming settings and select the Graphics tab.
 - Turn on MR with passthrough (scroll down to reveal).
In XR Twin:
- Your Project is open, using a VR Player.
-
In the Hierarchy panel, disable the Environment GameObject (Factory, Warehouse, WhiteLab, Outdoor or Ground, depending on the choice you made).
-
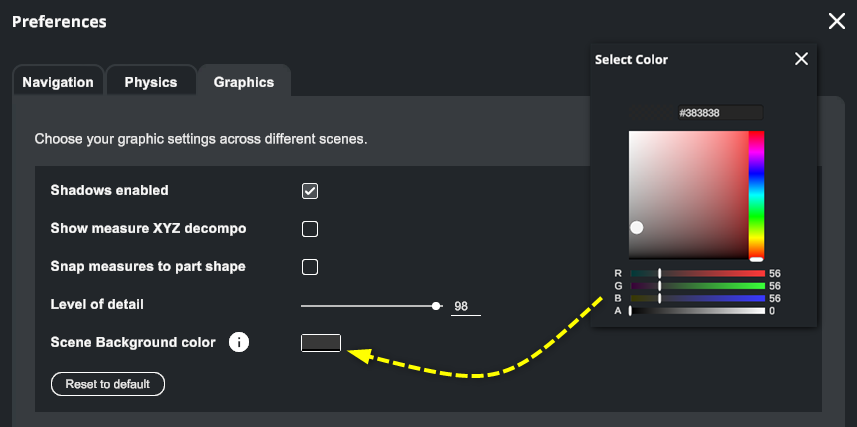
From the menu select Project > Preferences... and select the Graphics tab.
- Right Scene Background Color, click the color rectangle. Set alpha transparency A to 0.
- Click Apply to close Preferences popup.
- When ready, click Start to begin a "MR" simulation session. Your surroundings are displayed in the background.
For simple surroundings passthrough, see Tips for Focus below and scroll to Turn on passthrough shortcut.
Tips for Focus#
The VIVE Focus Vision headset has some useful features when you are immersed in an XR Twin VR simulation. Find here some ones and some useful tips.
XR Twin usage tips with Focus#
Set up left controller menu button to open the VR Menu#
By default, the standard left controller's menu button ![]() opens the SteamVR Settings menu. It may be more convenient to link this button to opening XR Twin's VR Menu during XR Twin simulations. From the VIVE Hub dashboard, go to the Settings > VIVE Streaming > VIVE Streaming settings section and select the Input tab. In the Controller section, disable Press
opens the SteamVR Settings menu. It may be more convenient to link this button to opening XR Twin's VR Menu during XR Twin simulations. From the VIVE Hub dashboard, go to the Settings > VIVE Streaming > VIVE Streaming settings section and select the Input tab. In the Controller section, disable Press ![]() to open SteamVR dashboard option.
to open SteamVR dashboard option.
VR using controllers#
- Use a VR+VRControllers User.
- To open the VIVE Menu, click the VIVE button
 on the right controller to open the headset system VIVE Menu.
 - To open XR Twin's VR Menu, click the Menu button
 on the left controller (see here for setup). Alternatively you can also press X or A buttons. Click again to close.
VR using hand tracking#
- Use a VR+Hands User.
- Open the VIVE Menu. Face your right palm inward. When the VIVE symbol appears, pinch your index finger and thumb together for 2 seconds until the validation ring fills up. The environment is stamped and the headset system VIVE Menu is displayed. Use the same gestures to close the VIVE Menu and resume simulation.
-
Use your controllers at any time. When using Hand Tracking, for your convenience, you can temporarily take your controllers for a walk or fly navigation or for use with other VR tools. When finish, resume hand tracking.
-
Use XR Twin's VR Menu during hand tracking session. It is currently not possible to open the XR Twin's VR Menu with native Focus gestures. To do so (and more), temporarily switch back to your left controller and press the Menu or X button to display the VR Menu, change options or use tools. This will evolve in a future XR Twin version. When finish, resume hand tracking.
- To resume hand tracking, put down both controllers on a flat surface and wait a few seconds for they enter in sleep mode and your headset to automatically switch back to Hand Tracking mode.
Focus tips#
Turn recording and casting on#
Focus Vision protects your privacy. To unlock screenshots and recordings when Passthrough mode is enable in VIVE Hub > VIVE Streaming, from the headset menu go to Settings > Advanced > Camera settings and turn on Allow passthrough recording and casting option. See vive.com[...]howto taking screenshots and videos to learn more. For complete instructions on taking screenshots and screen recordings, visit: vive.com[...]howto taking screenshots and videos.
Capture a screenshot#
To take a screenshot, either press at the same time VIVE + Trigger buttons on the right controller, or Headset + Volume Down buttons on the headset.
Record your screen#
To start recording, either press at the same time VIVE + Grip buttons on the right controller, or Headset + Volume up buttons on the headset. Press them again to stop recording.
Transfer to PC#
Screenshots and screen recordings are saved in the headset's Internal shared storage. You'll find screenshots in Pictures > Screenshots and screen recordings in Movies > Screenrecorder folders. You can transfer them to a storage card or computer:
- Connect the headset to the computer (use USB cable). Put on your headset and select File Transfer in Choose USB mode dialog box. You can take off your headset.
- On the computer, open a File Explorer and find VIVE Focus Vision as an Android external device. Navigate to the target folder (see above) and copy screenshots or screen records.
For complete instructions, visit vive.com[...]howto/transferring-screenshots-and-recordings-to-computer.
Cast#
You can cast what you see in the headset to a web browser on a computer or a mobile device via Wi-Fi. It's a clever way to share your VR experience in real time or make a recording of it.
To cast, headset and computer or mobile device must share the same Wi-Fi network and, Settings > Advanced > Camera settings > Allow passthrough recording and casting is turned on in the headset menu. For complete instructions, visit vive.com[...]casting the headset to a browser.
To casting the headset to a web browser:
- On the headset, open the VIVE menu (VIVE button on your right controller, or hand gesture). On the lower lectern, select Cast > Cast to browser. Remember IP address, formatted as: http://*[IP]*:8080/cast.
- On the computer or mobile device, open a browser and enter the same IP address. From Welcome page, click Connect. While viewing the VR screen in the browser, you can use the following controls:

(from left to right) Mute, Take a screenshot, Start/stop screen recording, Switch aspect ratio, Switch screen size. - To stop casting, click Disconnect in the browser or select Stop casting on your headset.
Stop streaming#
To stop streaming, press the VIVE button on the right controller and in the Quick Settings menu select Recent if an other option is current. From the Streaming app thumbnail, either select Quit then Quit App or Back to Lobby.
Resume streaming#
If streaming was interrupted, to resume and retrieve your XR Twin simulation, put on your headset. Currently you are in the VIVE Lobby. Close the Computer Connection window if displayed. From the VIVE Quick Setup menu, select Library if an other option is current. Top right, the Library filter must be set on PC (you can lock this). From PC VR apps page, click the SteamVR app and wait for reconnection. You are back in your XR Twin simulation!
Shut down#
To shut down headset and both controllers, either press the Headset button for a long time (4 seconds) or, in the popup window select Shut Down. The headset shut down after a few seconds. Alternatively press the battery button (rear right) for a long time (> 5 seconds).
Turn on passthrough shortcut#
In the VIVE menu, go to Settings > General and turn on Passthrough shortcut. You can now turn passthrough mode on and off to view your surroundings instead of your VR scene by quickly pressing twice either the Headset button or, the VIVE button on the right controller. Press twice again to toggle back. For complete instructions visit vive.com[...]howto/viewing-real-surroundings.
To display your VR objects in front of your real environment, see MR passthrough with Focus above.
Change duration for sleep mode#
To change how long the headset stays awake before going into sleep mode, go to Settings > Advanced, and for Sleep Mode select Never or a more convenient duration.
Tips for Focus with SteamVR#
Current Open XR Runtime#
- From SteamVR burger menu
 , navigate to Settings > OpenXR.
 - Check if Current OpenXR Runtime is SteamVR. If not, click SET STEAMVR AS OPENXR RUNTIME button.
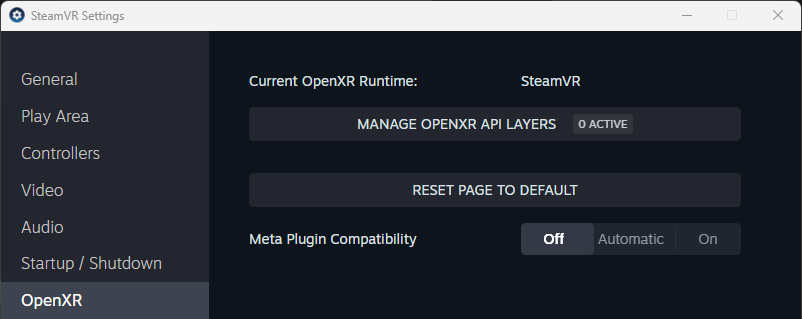
Manage OpenXR API Layers#
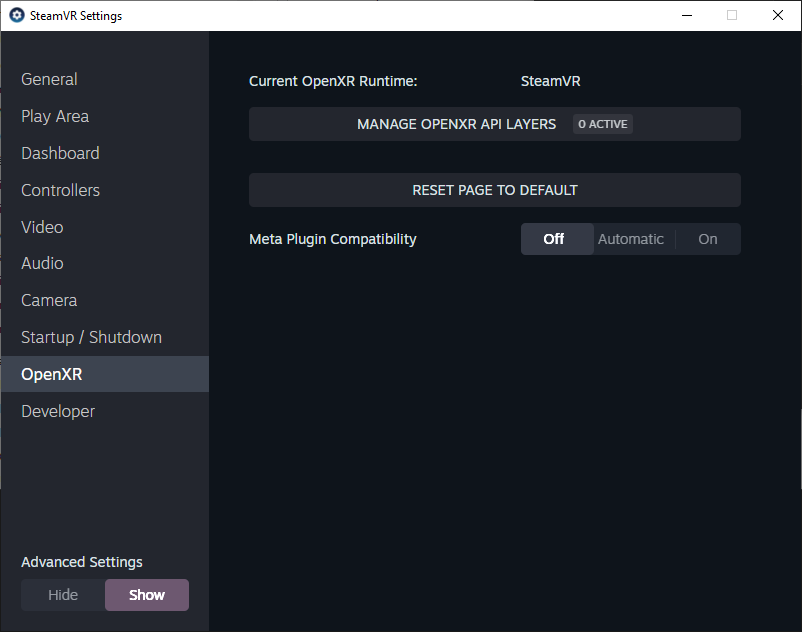
- From SteamVR burger menu , navigate to Settings > OpenXR.
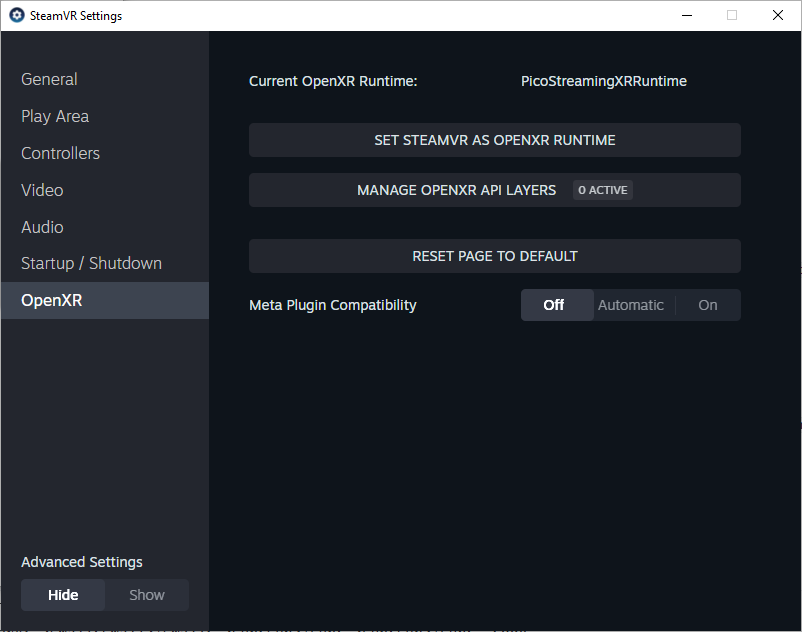
- Click MANAGE OPENXR API LAYERS button (see image above).
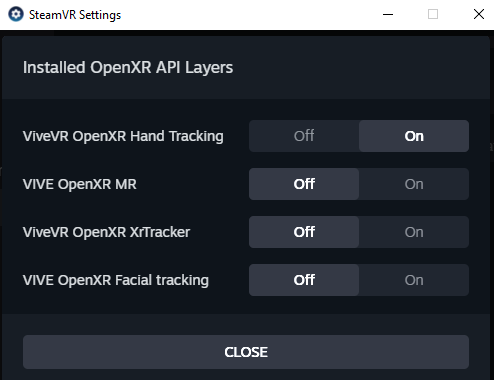
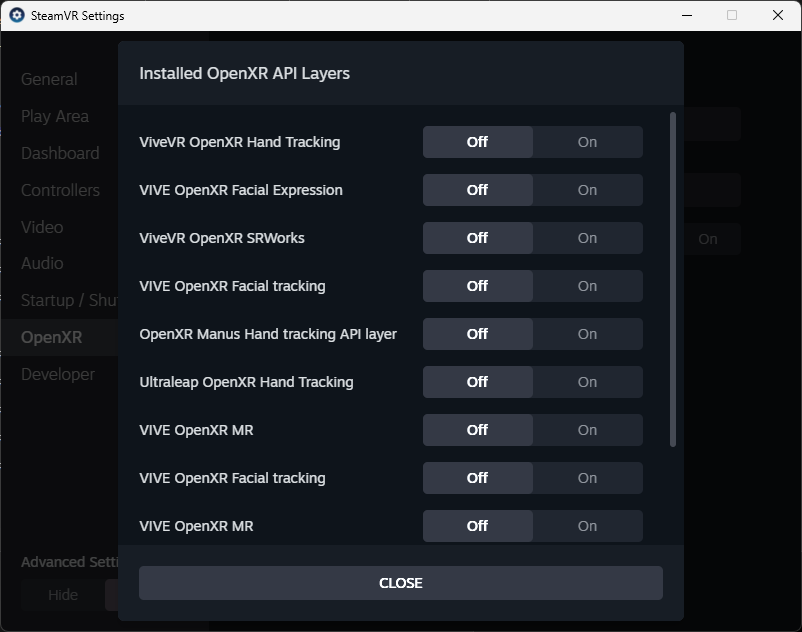
- In Installed OpenXR API Layers window, some unused layers can be turn "Off". For example:
- Turn Off VIVE OpenXR MR
- Turn Off VIVE OpenXR Facial tracking (LS GROUP have seen a significant impact on performance)
- Keep ViveVR OpenXR Hand Tracking layer "On" if you use hand tracking.
Tip
To learn more about installed API Layers, use OpenXR API Layers GUI. Download from github here.
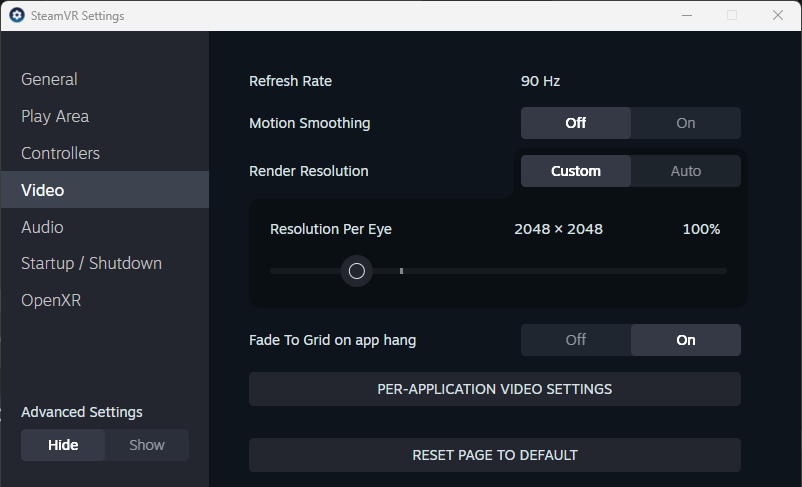
Manage the video resolution#
If you're looking to improve the frame rate, try lowering the “Resolution Per Eye” setting. However, this will result in a loss of resolution/sharpness.
- From SteamVR burger menu , navigate to Settings > Video.
- Set Render Resolution to Auto.
- If you prefer Custom, adjust the resolution. Start with 100%. A higher resolution will cost you performance.
Headset and controller buttons#
- Power on:
Press and hold the Power button (back-right on the battery pack) for 5-6 seconds, until the white battery LEDs light up. Put on your headset. When your head is detected, the VIVE logo will prompt you to wait while the headset wakes up from standby. Then follow the instructions. - Power off:
Press and hold the Power button for 4 seconds. The white battery LEDs will turn off and a beep sounds. Alternatively you can use - Passthrough:
Double-click the VIVE button on the right controller to turn passthrough mode on and off (to see your real surroundings). Alternatively, you can press twice the headset button on the front-left side of VIVE Focus 3.
To use the headset button or the right controller's VIVE button for turning passthrough mode on and off, go to Settings, select General, and turn on Passthrough shortcut. - VR menu:
Press Menu button on left controller to open XRTwin's VR Menu.
Updates#
Keep your VIVE Focus 3 system and firmware up-to-date with the latest features or enhancements. You can Check now at any time for updates or turn on Auto-update. See vive.com... firmware updates.
Keep your VIVE Business Streaming app up-to-date. From VIVE Business Streaming, click Settings>About. Click Check for updates. If a new version is available, click Install button.
You can update automatically from Steam app (internet connection requested). If you want to manually install offline versions, see business.vive.com... /downloads/steamvr (VIVE Enterprise Account needed).
Troubleshootings with Focus#
If something turns wrong, consult Solutions and FAQs section for vive.com... support/focus3 or vive.com... support/focusvision
OpenXR Runtime#
From the SteamVR menu, select Settings>OpenXR and check that Current OpenXR Runtime is SteamVR.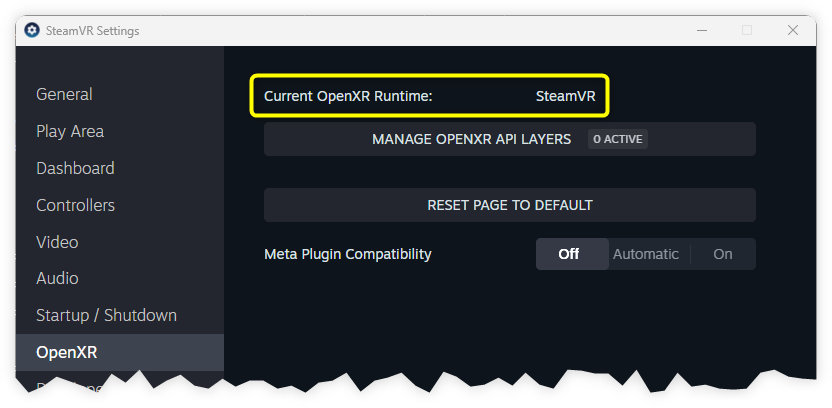
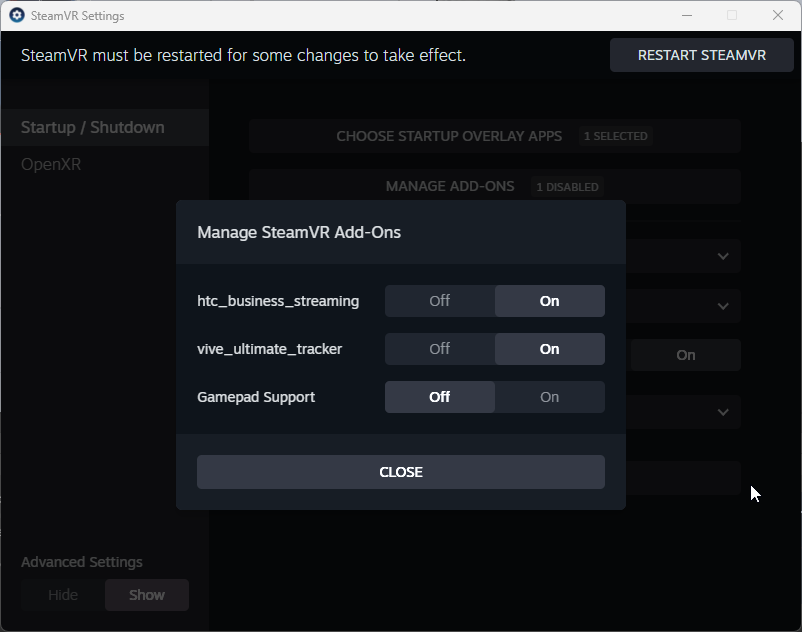
Add-ons#
From the SteamVR menu, select Settings>Startup>Shutdown tab>MANAGE ADD-ONS.
Add-on "htc-business_streaming" must be "On" (see images below). 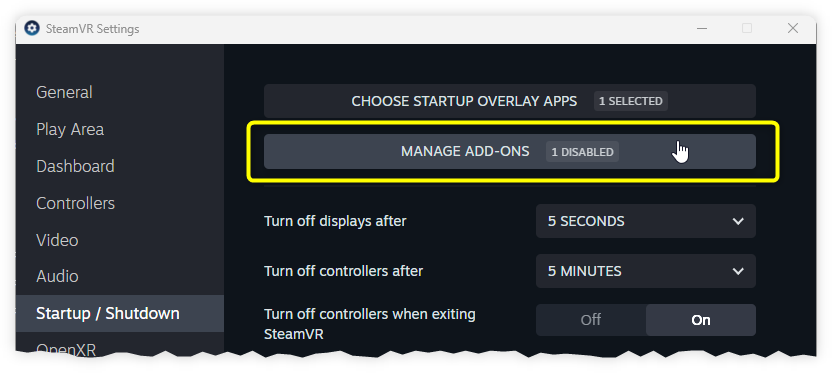
API Layers#
From the SteamVR menu select Settings>OpenXR>MANAGE OPENXR API LAYERS, set all "Off" (see images below).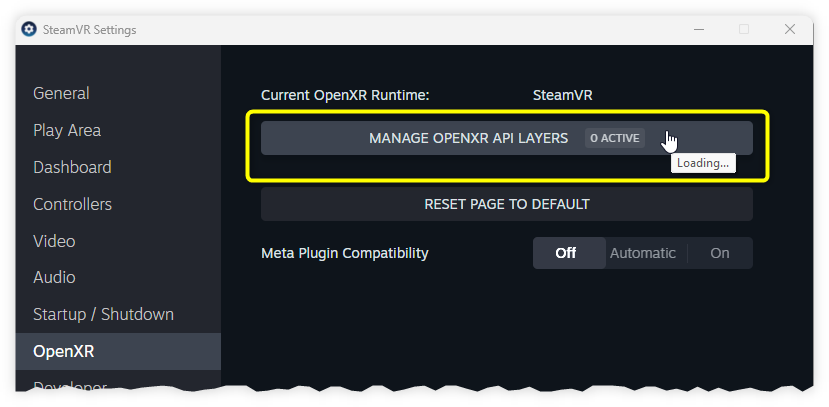
Inputs#
In VIVE Business Streaming app, from Settings>Input,
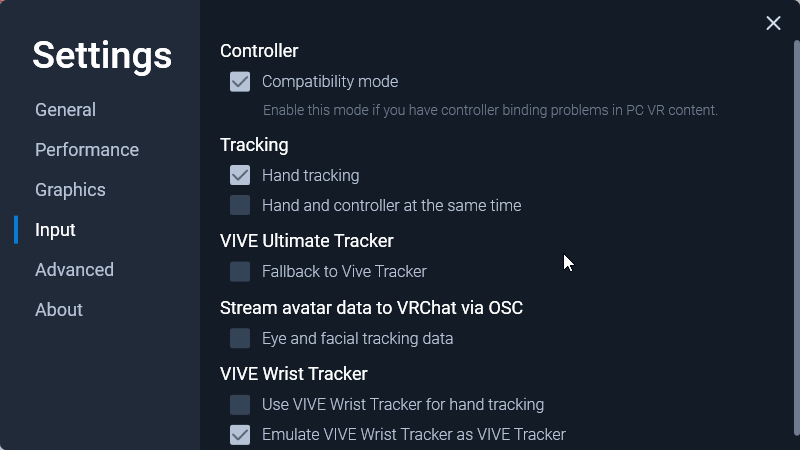
- Under Tracking, check Hand tracking if you want to use your hands. If you never use hand tracking, you can let it unchecked. See Handtracking section in this documentation.
- Under VIVE Ultimate Tracker, lets Fallback to Vive Tracker unchecked. See Trackers section in this documentation.
- Under Stream avatar data..., you can uncheck Eye and facial tracking data, not used by XR Twin.
Oculus Rift#
The Oculus Rift series, including the Rift® and the Rift S®, provides seamless integration with XR Twin, offering users an immersive VR experience with precise tracking and intuitive controls.
Find installation and configuration instructions in the manufacturer's documentation.
Oculus VR becomes Meta Quest after being acquired by Facebook in 2014.
See www.meta.com
Meta Quest#
With Meta Quest® headsets, users can enjoy wireless VR experiences. They can also easily connect to XR Twin using an USB cable for a fluid VR streaming experience (Meta Quest Link app required). Hand tracking is available.
To learn more about Meta Quest products, see meta.com ...Meta Quest.
For product support, visit Welcome to Meta Quest Help Center.

You will need:
- Meta Quest headset (version 2 or 3).
- Meta Horizon Link app installed on the computer.
- To connect to the computer, you need a USB-C 3.2 cable that supports a minimum of 5 GBs.
Install Quest#
1- Install and setup your Quest#
For first-installation instructions, see meta.com ...Welcome to Meta Quest Help Center.
2- Install Meta Horizon Link#
With Meta Horizon Link app, you can connect your Meta Quest with a PC Windows computer to stream your XR Twin simulation in the headset. To connect to the computer, you need a USB-C 3.2 cable that supports a minimum of 5 GBs to use Link.
Install Meta Horizon Link on the computer. For download and install instructions, see meta.com ...Set up and connect Meta Horizon Link.
When installed, open Meta Horizon Link software and check this settings:
- Set OpenXR Runtime
From Meta Quest Link side panel select Settings. Go to General tab and scroll to find OpenXR Runtime. If "Meta Horizon link" it is not already set as the active runtime, click Click Meta Horizon Link as active button.

- Enable Developer Runtime Features
To activate free hand tracking capabilities, go to Settings > Developer and turn on Developer Runtime Features.
Setup Quest#
If you installed it correctly the first time, here is how to quickly set up Quest 3 (similar for other Quest headsets):
Meta Horizon Link#
Start Meta Horizon Link. In the dashboard, check General > Open XR runtime (see above).
You can close the dashboard (service stay active, with a hidden icon in Windows' Taskbar).
Connect to computer#
Plug the USB-C end of your cable to the Quest 3 headset. Depending on the output of your computer, connect the other USB-C or USB-A end of the cable to your computer.
Launch Link#
- Put on your Quest headset.
- To open the universal menu, press
 META button on the right controller (toggle).
 - Select the clock on the left side to open Quick settings.
- Select
 Link, then select the computer your headset is plugged into.
 - From the Link window, click Launch. Streaming starts immediately.
Check#
In the headset, you are now in the Quest's waiting space, an infinite luminous white space with a grid pattern on the floor and ceiling.
You are ready to use XR Twin: Launch XR Twin and open your project. Check the User is VR + Controllers (you will use controllers) or VR + Hands (you will use headset hand tracking). When ready, click Start and enjoy the VR simulation.
Tips for Quest#
The Meta Quest headsets have some useful features when you are immersed in an XR Twin VR simulation. Find here some ones and useful tips.
XR Twin usage tips with Quest#
VR Menu#
Press Menu button on left controller to open XRTwin's VR Menu.
MR Passthrough with Quest#
MR passthrough unavailable with Quest 3
MR Passthrough who cut out the background to see your scene objects in front of your real-life surroundings is currently not offered by the headset.
Quest tips#
Passthrough#
Built-in passthrough is a feature on Meta Quest headsets that allows you to step outside your immersive view to see a real-time view of your surroundings. To configure Passthrough options, press ![]() Meta button to open the universal menu and go to Settings > General > See your Surroundings. Turn it on will add this option as a button in the Quick Settings panel.
Meta button to open the universal menu and go to Settings > General > See your Surroundings. Turn it on will add this option as a button in the Quick Settings panel.
To turn Passthrough on or off, select the clock on the left side of the universal menu to open the Quick settings, then select the See your surroundings button. Alternatively, you can tapping either the left or right side of your headset twice to.
Other Quest tips#
Search for the bold text below in the Meta Quest Help Center search bar for detailed descriptions.
- Use Air Link for wireless streaming. A dedicated Wi-Fi router is recommended (Wi-Fi 5 and 5 GHz or higher).
- Cast to a screen on computer or mobile phone.
- Take a photo shortcut: Start by holding the Meta button on the right controller. While holding, press and release the right trigger to immediately take a photo of what you're seeing.
- Record a video shortcut: Start by holding the Meta button on the right controller. While holding, press and hold the right trigger to start recording. To stop recording, repeat the controller shortcut.
- Transferring photos and videos to a Windows computer.
SteamVR#
SteamVR app is not required, but is still compatible with Meta Quest Link and XR Twin. Check that Oculus is the "Current OpenXR Runtime". If not, see above Setup Meta Horizon Link.
Troubleshootings with Quest#
If something turns wrong, consult the Meta Quest Help Center here: meta.com ...Fix a problem.
- If you press the META button while you're in an app, the curved dashboard menu will display a limited set of options. If you want to return to the Lobby, click Quit App first, then Quit Link. Once you're back in the Lobby, the universal menu will be available with all options.
- When you put on your Quest headset, Passthrough may be "on" (you see your environment) or "off" (you are in the Quest virtual Lobby or in your VR application). To toggle passthrough on or off, open the universal menu, select the clock on the left side of the universal menu to open Quick Settings, and click See your surroundings (toggle).
- If no PC is suggested when trying to activate Link and the message "Searching for PC..." is displayed, try Restart your Meta Quest headset.
Varjo#
Offering unparalleled visual fidelity and accuracy, the Varjo XR-3® and Varjo XR-4® headset delivers a premium VR experience ideal for professional applications and simulations.
Info: Need advice?
If you need advice, please send an email to xrtwin-support@ls-group.fr.
Find installation and configuration instructions in the manufacturer's documentation. To learn more about Varjo products, see varjo.com. For product support, visit Varjo Support.
To stream XR Twin VR simulations to Varjo headsets, you will need:
- Varjo XR-3 or XR-4 series headset
- Varjo Base installed on the computer
- SteamVR installed on the computer (optional, only if you need steamVR compatible controllers or trackers).
Install Varjo#
For first-installation instructions, see varjo.com support.
- Install and set up Varjo Base on the computer. Download last version from here: download varjo base.
- Install and set up SteamVR. Use offline version (recommended) or download online version from Steam web site (Steam account needed). Then launch it first time to complete the installation.
- Deploy and install VIVE virtual reality system, consisting of Base Stations and VIVE controllers. Update firmware if asked.
- In Varjo Base, select the Settings tab (on top).
- Select System in the left panel. In the Tracking section, for Headset tracking select SteamVR. In the Compatibility section, disable OpenVR and enable OpenXR.
- Select Headset in the left panel. As an option, if you want to use your hands instead of controllers, in Hands section, enable Hand tracking.
Setup Varjo#
Your headset was installed completely the very first time. For subsequent setups, here’s how to quickly get your Varjo headset up and running.
- Enable VIVE Base Stations.
- Start Varjo Base.
- Connect Headset adapter to PC computer and headset cables to the adapter. See Varjo Base Headset page schemes if some thing is missing.
- When headset is connected, turn on controllers. Base Stations and both controllers are shown in the Varjo Base interface.

- Launch XR Twin and open your project. Use a VR+Controller User if using VIVE Controllers or a VR+Hands User if using Varjo's hand tacking.
- Click Start to begin streaming your simulation.
MR Passthrough for Varjo#
In XR Twin:
- Your Project is open, using a VR User.
-
In the Hierarchy panel, disable the Environment GameObject (Factory, Warehouse, WhiteLab, Outdoor or Ground, depending on the choice you made).
-
From the menu select Project > Preferences... and select the Graphics tab.
- Right Scene Background Color, click the color rectangle. Set alpha transparency A to 0.
- Click Apply to close Preferences popup.
- When ready, click Start to begin a "MR" simulation session. Your surroundings are displayed in the background.
Tips for Varjo#
XR Twin usage tips with Varjo#
VR using controllers#
- Use a VR+Controllers User.
- To open XR Twin's VR Menu, click the Menu button on left or right controller. Alternatively you can also press X or A buttons. Click again to close.
VR using hand tracking#
- Use a VR+Hands User.
-
Use your controllers at any time. When using Hand Tracking, for your convenience, you can temporarily take your controllers for a walk or fly navigation or for use with other VR tools. When finish, resume hand tracking.
-
Use XR Twin's VR Menu during hand tracking session. It is currently not possible to open the XR Twin's VR Menu with native Varjo gestures. To do so (and more), temporarily switch back to your left, right or both VIVE controller(s) and press the Menu button to display the VR Menu, change options or use VR tools. This will evolve in a future XR Twin version. When finish, resume hand tracking (see next topic).
- To resume hand tracking, put down both controllers on a flat surface and wait a few seconds for they enter in sleep mode and your headset to automatically switch back to Hand Tracking mode.
Varjo tips#
Take a screenshot#
From Varjo Base Headset tab, click Screenshot. The image files are stored on the PC computer in the Image > Varjo directory.
Record your screen#
From Varjo Base Headset tab, click Record. The video files are stored on the PC computer in the Video > Varjo directory.
Open SteamVR#
From Varjo Base Headset tab, click More > SteamVR to open the SteamVR dashboard.
Use controller as a mouse#
From Varjo Base Settings tab, select Workspace in the left panel and enable Controller. You can now use your controller to click on the virtual desktop in the same way as you would with a mouse. For example, change some things in design mode and click Start from within the headset.
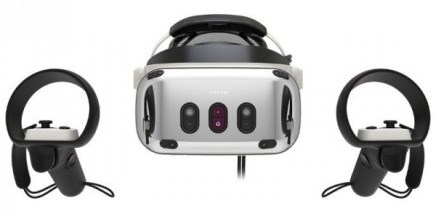
Apple Vision Pro#
Since ALVR apps allow you to connect an Apple Vision Pro® (AVP) to SteamVR via a wired connection or Wi-Fi, you can use your Apple Vision Pro® with XR Twin this way. With the AVP headset you use hand tracking to interact with your virtual project. You can enable Passthrough to project your 3D models in front of your real environment.
For product overview, visit apple.com/apple-vision-pro/. For product support, visit Apple Vision Pro Support.
To stream XR Twin VR simulations to Apple headset, you will need:
- Apple Vision Pro® headset (AVP).
- ALVR app installed both on the computer and the headset.
- SteamVR app installed on the computer.
- A high-end, dedicated Wi-Fi router. An Ethernet cable.
Install Apple Vision Pro#
Requirements and best performance?
Requirements:
- Computer running a compatible OpenVR runtime on Windows
- Apple Vision Pro® must be on the same local network as the computer
For best performance:
- Ensure you are connected to a 5GHz 802.11ac router within 20 feet of your playspace with local network speeds greater than 200Mbps
- Ensure network activity from other devices on your 5GHz router is minimal (if possible, use a dedicated AP for streaming)
- Make sure your streaming computer is connected directly to the router via ethernet
(source: App Store for Vision + search for ALVR app)
Visit wiki/Checklist and wiki/Information and recommandations for more information.
1- Set up your Wi-Fi router#
It is highly recommended that you use a high-end, dedicated Wi-Fi router (see above).
- Connect your router to the computer with an Ethernet cable.
- Configure your corresponding Ethernet and Wi-Fi connections so that both Apple Vision Pro® and computer share the same network.
Example of automatic Pv4 addresses: Router: 10.0.0.1, Computer: 10.0.0.2, Vision Pro: 10.0.0.4.
2- Install ALVR#
What's ALVR?
ALVR are open-source application that makes it easy to stream OpenVR apps from your computer to your Apple Vision Pro® via Wi-Fi, with support for hand gesture input and more [...].
(source: App Store for Vision + search for "ALVR" app)
Install ALVR on computer:
Main installation steps (on ALVR's web platform, visit wiki pages for detailed installation instructions and more):
- Download
alvr_launcher_windows.zip(on Windows) from the release download page and extract into a path that contains only ASCII characters (english only) and has edit permissions without administrator or root rights. - Run
ALVR Launcher.exe - In ALVR Launcher, press Add version button.
- For default installation, keep channel and version as is and press Install.
Wait until it finishes downloading and installing. - When back in the ALVR Launcher, Press Launch (ignore "Install APK", its for Quest headsets).
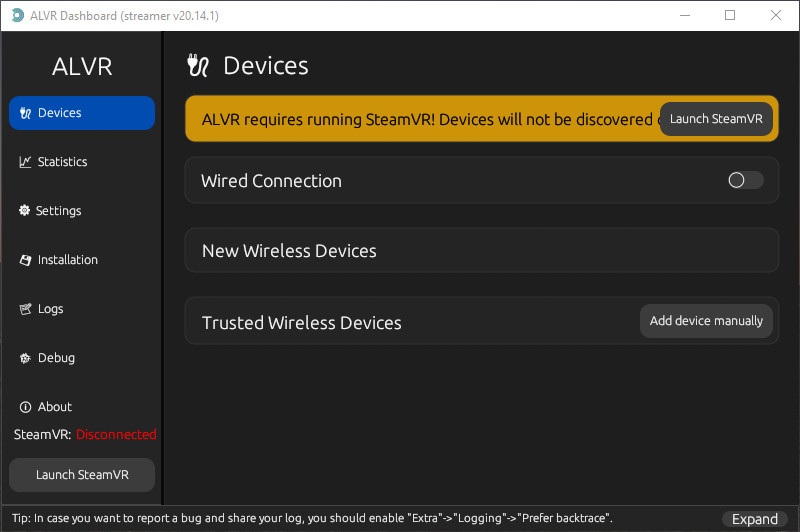
- The ALVR Dashboard opens.
-
Press Next several times.
- Read each ALVR Setup Wizard instructions.
- You can skip the microphone step, not needed for XR Twin projects (you can add it later).
- Press Add firewall rules when asked (requires administrator rights).
- When completed, press Finish button.
-
The ALVR Dashboard window will update, waiting for SteamVR and device connections. Let it open.
- Install ALVR on headset:
Install ALVR app on your Apple Vision Pro® headset:
- Equip yourself with the headset.
- Open the Settings app and select the Wi-Fi page. Then select a Wi-Fi network that can connect the Apple Vision Pro® to the internet.
- Launch the App Store app, search for ALVR and install it.
- Return to Settings > Wi-Fi and select your dedicated Wi-Fi network.
- Launch the ALVR in-app.
- The ALVR's Main Settings panel is displayed, trying to connecting (see the "Connecting..." message just below the panel).
3- Open SteamVR#
In ALVR Dashboard, SteamVR connection status is monitoring bottom left. Default is Disconnected. If SteamVR is already open and connected, skip this section.
- On the computer, start SteamVR.
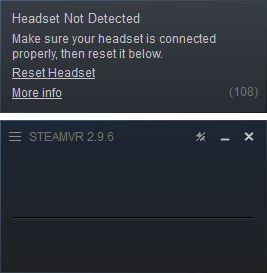
- Wait for connection (if Headset Not Detected, see tip below).
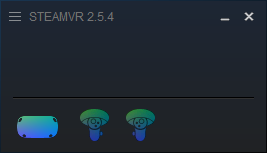
- After connecting, monitoring change for Connected in the ALVR Dashboard...
- ... and SteamVR window opens with just one icon.

If first launch failed, start SteamVR again...
First time launch will result in SteamVR being empty (Headset Not Detected or waiting ring) and ALVR Dashboard will not connect. Close SteamVR and start again. It will have registered driver and should work (for other troubleshooting information, refer to the wiki/Troubleshooting) section.
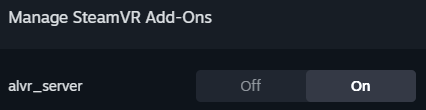
You can also check alvr_server status (click here to see more...)
You can check the status of alvr_server in the SteamVR Settings window. Go to Startup/Shutdown and click Manage Add-Ons. In Manage SteamVR Add-Ons pop-up window, make sure that alvr_server is turned on. Some times add-ons can be blocked. Click to unblock.
4- Add new device#
When you open the ALVR in-app in the Apple Vision Pro®, the headset device will be detected by the ALVR Dashboard (on the computer). Keep the Apple Vision Pro® on your head.
If your headset is detected:
If detected, your device is listed under New Wireless Devices in the ALVR Dashboard (2168.client.alvr in image below).
- Click Trust. Your device moves under Trusted Wireless Devices.
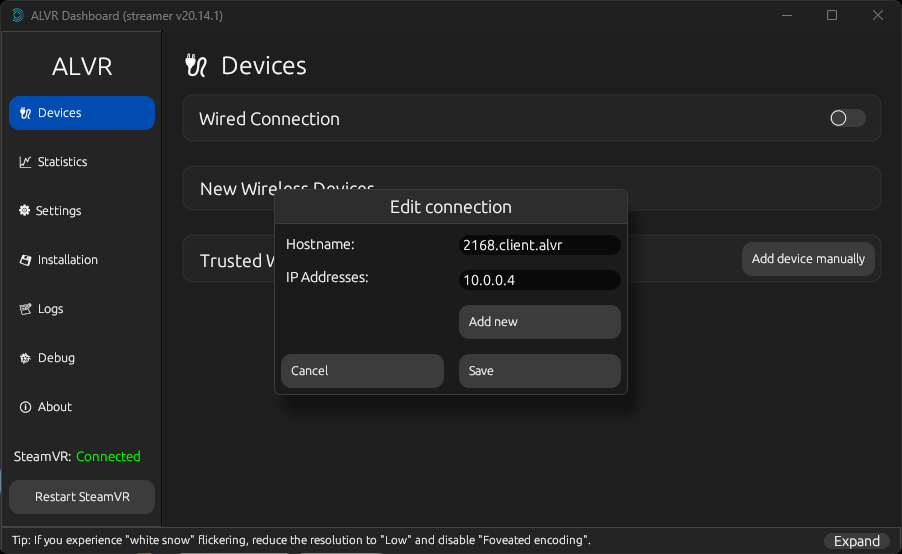
- Click Edit.
- In the Edit connection window, the headset's Hostname has been filled automatically. Just click Add new and change for the headset IP address (
10.0.0.4in our example). - Then click Save.
If your headset is NOT detected:
If nothing appears below New Wireless Devices.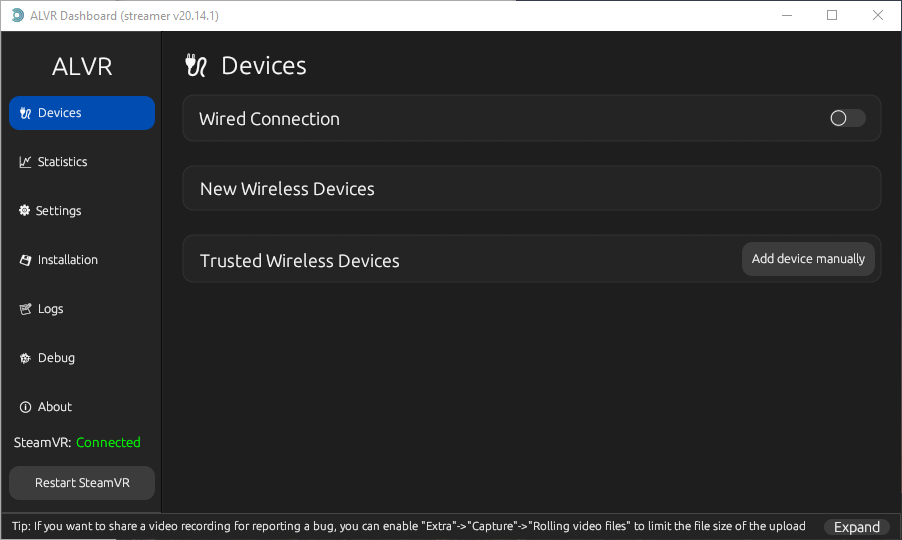
- Click Add device manually.
- In the Edit connection window, enter the headset hostname. Click Add new and replace with the headset IP address.
NOTE: Use the headset's Hostname and IP address displayed at the bottom of the ALVR panel. - Click Save to close the window.
In both situations, your device is added under Trusted Wireless Devices.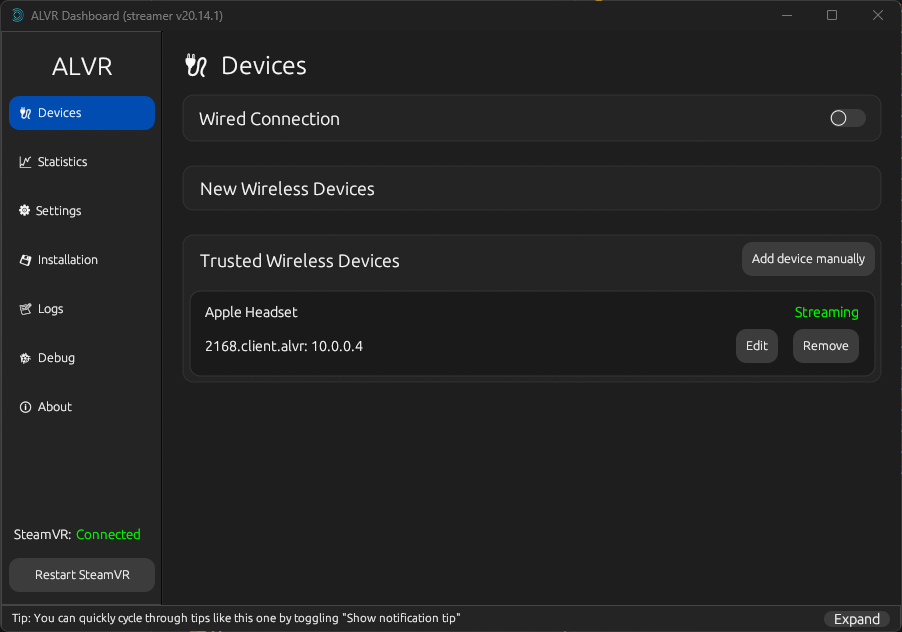
Apple Vision Pro® setup is now complete.
Setup Apple Vision Pro#
Your headset was installed completely the very first time. For subsequent setups, here’s how to quickly get your Apple Vision Pro® headset up and running.
Start conditions#
Check for start conditions on the computer and the Apple Vision Pro® headset:
-
On the computer, start ALVR launcher.exe first. Click Launch to display the ALVR Dashboard. Then, start SteamVR.
-
In the Apple Vision Pro, open the ALVR in-app. After connecting delay, note that the Enter button is displayed, but wait starting XR Twin simulation before using it (see below).
- In ALVR Dashboard, both SteamVR (left) and Apple Vision Pro headset (right) are detected and connected. Monitoring updates: SteamVR is as Connected (bottom left), and headset is Streaming (right) as long as it is on your head (thanks to the presence sensor).
 >
> - In SteamVR interface, status is "Standing by". Headset and controller icons are displayed.
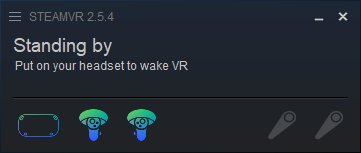
Your devices are ready for an XR Twin VR simulation. You can remove the Apple Vision Pro® headset at any time, even if doing so causes the ALVR in-app to close and lose the connection. When you put the headset back on, just open the ALVR in-app again.
Start XR Twin VR session#
In XRTwin, open a project with a VR Player + Hand &Finger Tracking. Click Start to launch the simulation.
Start streaming#
Equip yourself with the Apple Vision Pro®. From within the headset, open the ALVR in-app. Below the ALVR in-app's panel, wait for connection. When it appears, click the Enter button to begin streaming.
If the Recently Played / Welcome to SteamVR panel is open, use Apple Vision Pro's "tap" gesture twice to close it.
Enjoy to move in your XR Twin VR scene and interact objects with your hands!
SteamVR status
When XR Twin's simulation is running, SteamVR status updates with "Now Playing XR Twin". Controller icons are gray when your hands are visible to the headset and blue if they are not.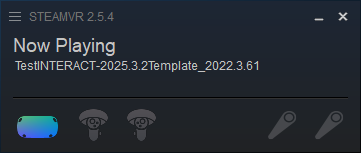
The ALVR panel closes every time you remove the headset
The ALVR in-app panel automatically closes and disconnects you from ALVR Dashboard when you remove the Apple Vision Pro® headset (this is due to the headset's presence sensor). Each time you put the headset back on, you will need to reopen the ALVR in-app and wait a few seconds for it to reconnect. When the Enter button reappears, you are back and can click it to reenter the simulation.
MR Passthrough with AVP#
You can use the chroma keyed passthrough capabilities of your Apple Vision Pro® to see your real environment behind your VR rendered 3D models and enjoy augmented reality!
To set up Apple Vision Pro® Chroma Key Passthrough settings:
- In Apple Vision Pro®
- Equip yourself with the Apple Vision Pro® headset and launch the ALVR in-app.
- Left of the Main Settings panel, open Advanced Settings panel.
- The Enable Chroma Keyed Passthrough property must be active (toggle is green).
- Click the color circle right of the Chroma Key Color property to open the Chroma Key Color pop-up. Select the Sliders tab and set the RGB sliders to (0, 200, 0) respectively. Click the (+) button to save this color for future reuse.
Note: Set the same RGB color as for you Unity scene background (see just below).
- In XR Twin:
- Your Project is open, using a VR Player.
- In the Hierarchy panel, disable the Environment GameObject (Factory, Warehouse, WhiteLab, Outdoor or Ground depending on the choice you made).
- From the Project menu select Preferences...
- In the Preference popup, select Graphics tab.
- Right Scene Background Color, click the color rectangle.
- Set green color with RGB values as (0, 200, 0) respectively.
Note: Set the same color as for the headset's Chroma Key Color (see above). Alpha value is ignored.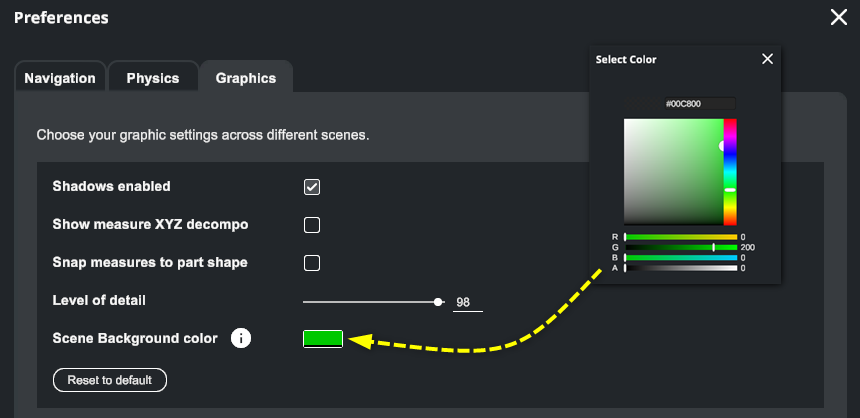
Tips for AVP#
Use gestures with Apple Vision Pro
XR Twin usage tips with AVP#
VR simulation using hand tracking#
- Use a VR+Hands User.
- Open the Home view. Press Digital Crown once to open the AVP's Home view. This stops the streaming and displays your surroundings.
- Resume streaming. From the Home view, restart ALVR, wait for connection and tap Enter to resume simulation.
- Open XR Twin's VR Menu. It is currently not possible to open the XR Twin's VR Menu with native AVP gestures. This will evolve in a future XR Twin version. Although it is possible to connect controllers from other manufacturers using ALVR, this topic is beyond the scope of this documentation.
AVP tips#
Quick passthrough#
Press the Digital Crown button twice to switch between your content and a view of your surroundings.
Take a screenshot#
Press the top button and the Digital Crown simultaneously to take a screenshot.
Your screenshots are stored in the Photos app.
Record your screen#
- Open the control center, then tap record.
- To stop recording, open the control center and tap record again.
Your records are stored in the Photos app.
Watch screenshots and recordings#
Use Photos app to display your screenshots and recordings.
Share screenshots or recordings#
- Open the Photos app on your AVP headset.
- Tap
 next to the screenshot or record. Tap
  and select an option as AirDrop, Mail or Message.
Quickly reset eye and/or hand settings#
Click the top button (left) four times very quickly, then follow the instructions. Alternatively, go to Settings > Eyes and Hands and select Reset Eye Settings or Reset Hands Settings, then follow the instructions.
Top button#
The Top button is a physical control located on the upper left side of the Apple Vision Pro. You can press the top button once to open the Capture app, press it twice to make purchases, and use it in combination with the Digital Crown to force apps to close and to turn off the Apple Vision Pro.
Digital Crown#
The Digital Crown is a physical control on the upper right side of the Apple Vision Pro. You can turn it to adjust immersion or volume, press it once to open the home view, and press it twice to switch between your content and a view of your surroundings.
Turn on#
Press and hold the button until the Apple logo appears on the watch face (the power cable indicator light will also turn on).
Turn off#
Press and hold the top button and the Digital Crown simultaneously until the Shut Down panel appear, then drag the slider to turn off the device. Alternatively, go to Settings > General > Shut Down.
The Force Quit Applications panel will appear first: continue holding.
Force to restart#
Press and hold the top button and the Digital Crown simultaneously for a long time until the Apple Vision Pro turns off. Remove the headset to begin the restart.
The Force Quit Applications panel followed by the Shut Down panel will appear first: continue holding until the screen goes black.
ALVR tips#
Optimize ALVR configuration#
Although the default settings allow you to enjoy the immersive experience with Apple Vision Pro, feel free to adapt the numerous ALVR Dashboard's Settings to optimise performance. Begin with wiki/Settings tutorial by github.com.
You can find other tips and suggestions online. For example, visit getting started with alvr on vision pro by reddit.com.
Most of the settings require to restart SteamVR to be applied. SteamVR can be restarted automatically
Most changes to the ALVR settings require SteamVR to be restarted to be applied. ALVR restarts SteamVR when you click the "Restart SteamVR" button on the bottom left corner, or automatically when your Apple Vision Pro® connects again.
If your version of SteamVR is not up to date, ALVR will launch the Steam app automatically to allow you to update it. If you are using an offline version of SteamVR or do not want to update, remember to interrupt this process and restart your SteamVR app manually.
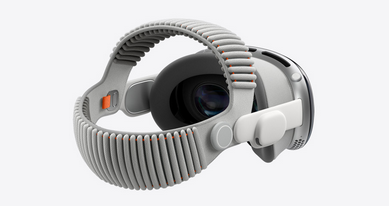
PICO#
The Pico 4 Ultra Enterprise® headset is designed for businesses and professionals. Equipped with mixed reality features, this next-generation MR VR headset offers a highly accurate immersive experience.
[PICO. PICO 4 Ultra Entreprise. Retrieved February 25, 2026, from https://www.picoxr.com/global].
For product overview, visit picoxr or pico4-ultra. For support, visit PICO business > Documentation.
To stream you XR Twin simulation to a PICO 4 Ultra Entreprise® headset, you will need:
- A PICO 4 Ultra headset. A PICO|Business account.
- PICO "Business Streaming" software and SteamVR software installed on the computer.
- PICO "Business Streaming" app installed on the headset (pre-installed).
- A cable for USB wired streaming. For cable requirements visit USB wired streaming in the PICO documentation.
- PICO 4 Ultra is compatible with a Wi-Fi 7 wireless connection. It is strongly recommended to use a dedicated router, Wi-Fi 6 or better.
Install PICO#
To download PICO "Business Streaming" software, click PICO business and navigate to Documentation > PICO Business Streaming > Business Streaming 2.1, then scroll. Download then install latest PC version.
To download SteamVR, click here: steampowered store (Steam account needed) or install an offline version.
Setup PICO#
Your headset was installed completely the very first time. For subsequent setups, here’s how to quickly get your PICO headset up and running.
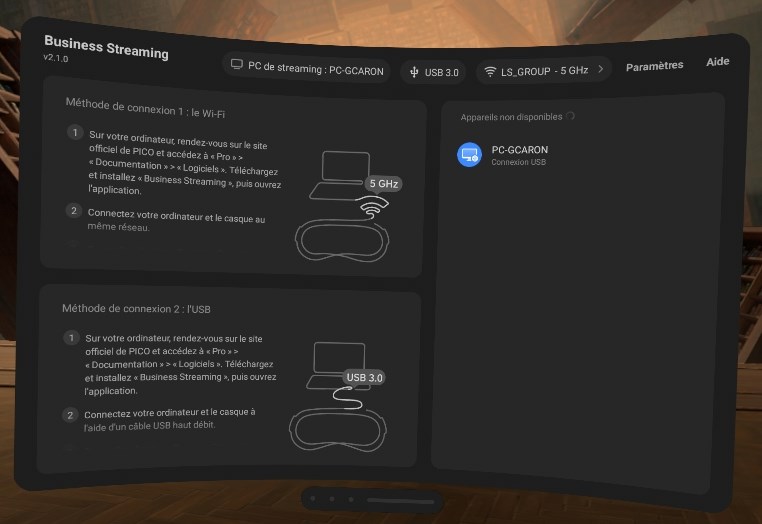
- Turn on your PICO 4 Ultra. Link headset to the computer for USB wired streaming, or ensure headset and PC share the same Wi-Fi network.
- On the computer, open PICO Business Streaming (status: Waiting for Connection).

- From the headset Home menu, start Business Streaming
 app
app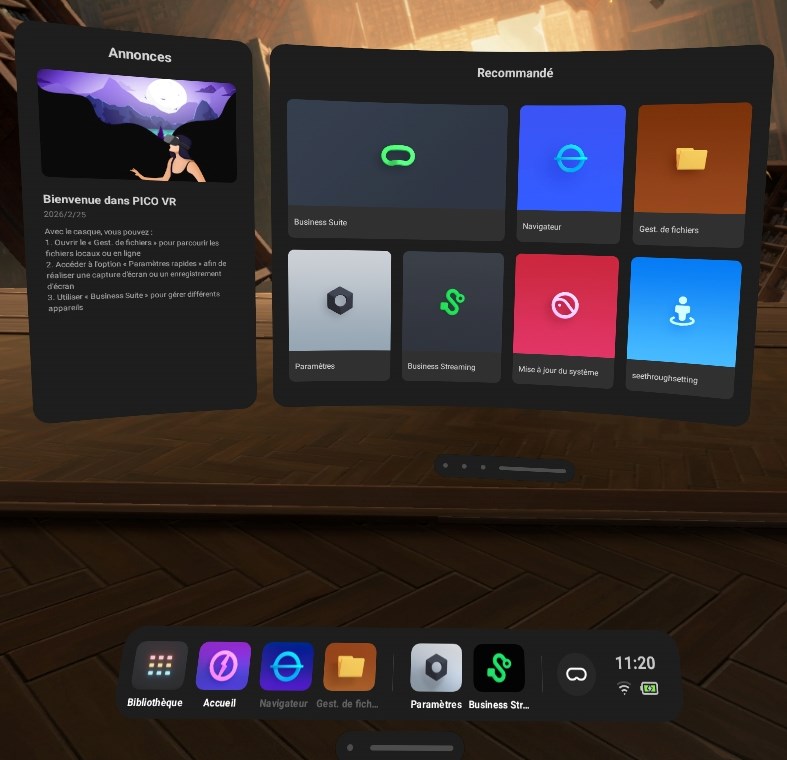
-
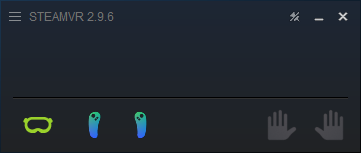
On the computer, headset and controllers are connected
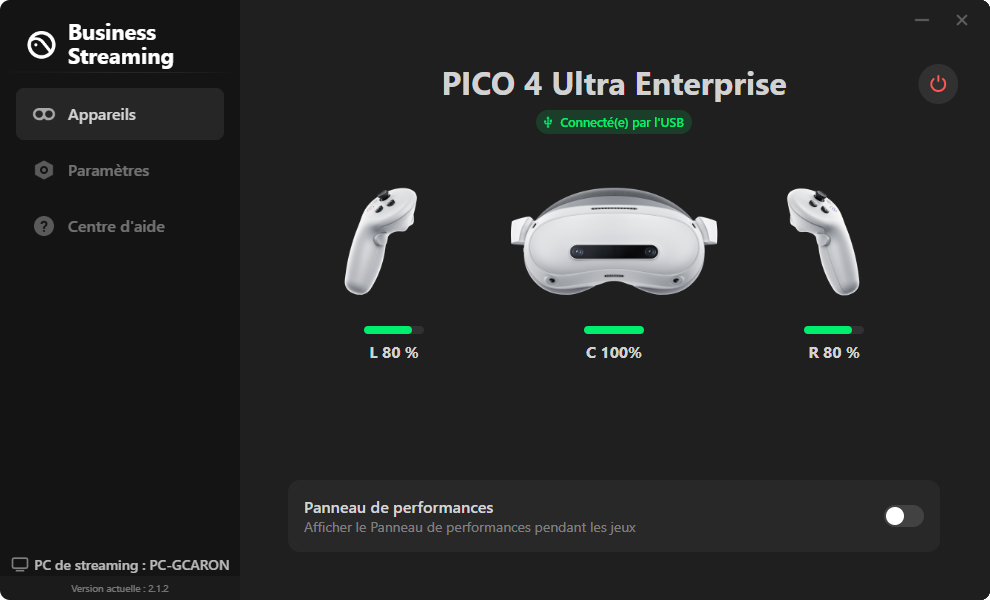
-
On computer, starting SteamVR is optional (automatically closed when streaming starts)
When setup is complete, you can open your XR Twin project and start VR simulations.
#
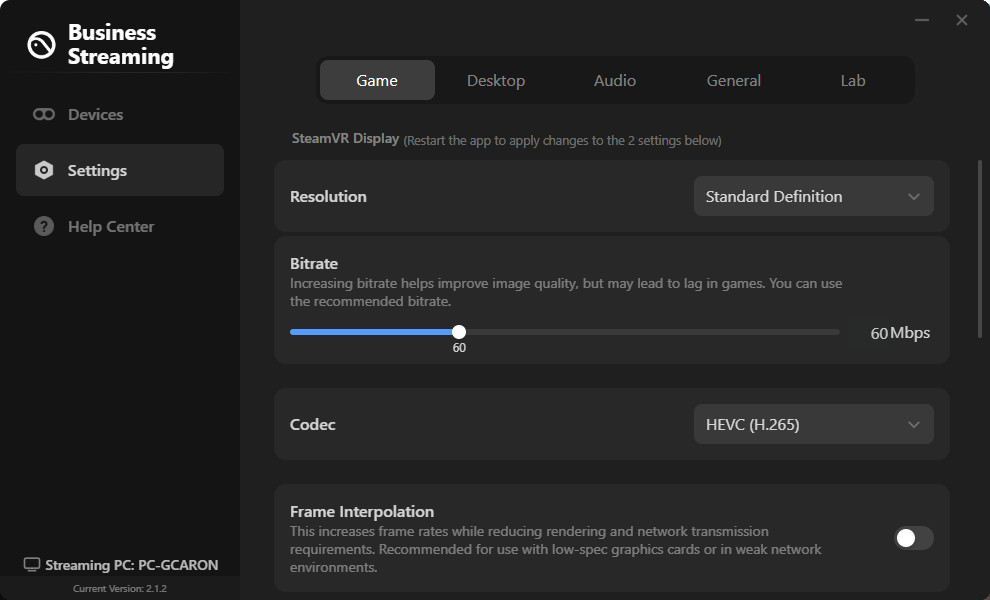
PICO Business Streaming settings#
Use default settings. Feel free to adjust.
SteamVR settings#
PICO Business Streaming use a specific Open XR runtime. To check before streaming, open the SteamVR menu and navigate to Settings > OpenXR. PicoStreamingXRRuntime must be the Current OpenXR Runtime.
The SteamVR UI displays the headset. Depending on what is detected, controllers or hands are displayed too. You can close SteamVR (will be closed automatically when streaming starts).
Tips for PICO#
Find here some useful features and tips for PICO 4 headset.
XR Twin usage tips with PICO#
VR simulation using controllers#
- Use a VR+VRControllers User.
- Click the Menu button on the left controller to open XR Twin's VR Menu. Alternatively you can also press X or A buttons. To close the VR Menu, click again.
- Short press the Capture button on right controller to take a screenshot.
- Press and hold 2 seconds the Capture button on right controller to start recording. Press and hold again to stop.
VR simulation using hand tracking#
- Use a VR+Hands User.
- Use your controllers at any time. When using Hand Tracking, for your convenience, you can temporarily take your controllers for a walk or fly navigation or for use with other VR tools. When finish, resume hand tracking.
- Use XR Twin's VR Menu during hand tracking session. It is currently not possible to open the XR Twin's VR Menu with native PICO gestures. To do so (and more), temporarily switch back to your left controller and press the Menu or X button to display the VR Menu, change options or use tools. This will evolve in a future XR Twin version. When finish, resume hand tracking.
- To resume hand tracking, put down both controllers on a flat surface and wait a few seconds for they enter in sleep mode and your headset to automatically switch back to Hand Tracking mode.
PICO tips#
Headset#
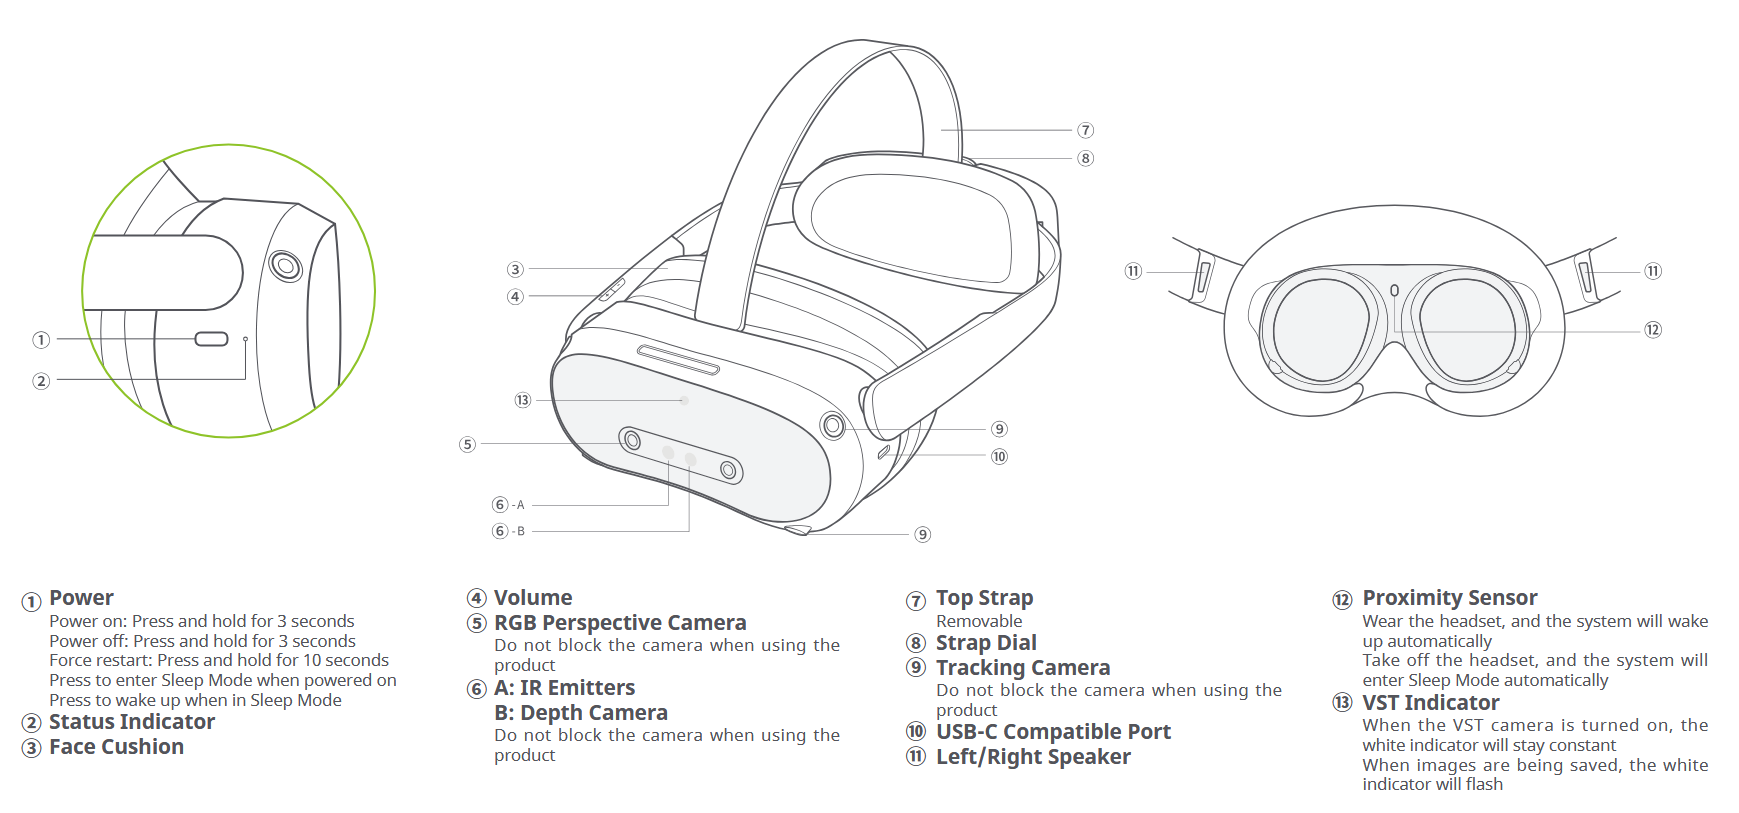
| Function | Action |
|---|---|
| Power button (headset right side) | |
| Power on | Long press for 2 seconds (on the headset right side) |
| Power off | Long press for 5 seconds |
| Hardware reset | Long press for 10 seconds |
| Enter sleep mode or wake up | Short press |
| In the PICO system settings | |
| Adjust the interpupillary distance | In System Settings, go to “Settings” ► “Display” to adjust the pupil distance. Tap “+” or “-” to fine-tune the pupil distance until you have a clear view. |
| On the headset shell | |
| Activate Transparent mode | Tap the right side of the headset twice |
Controllers#
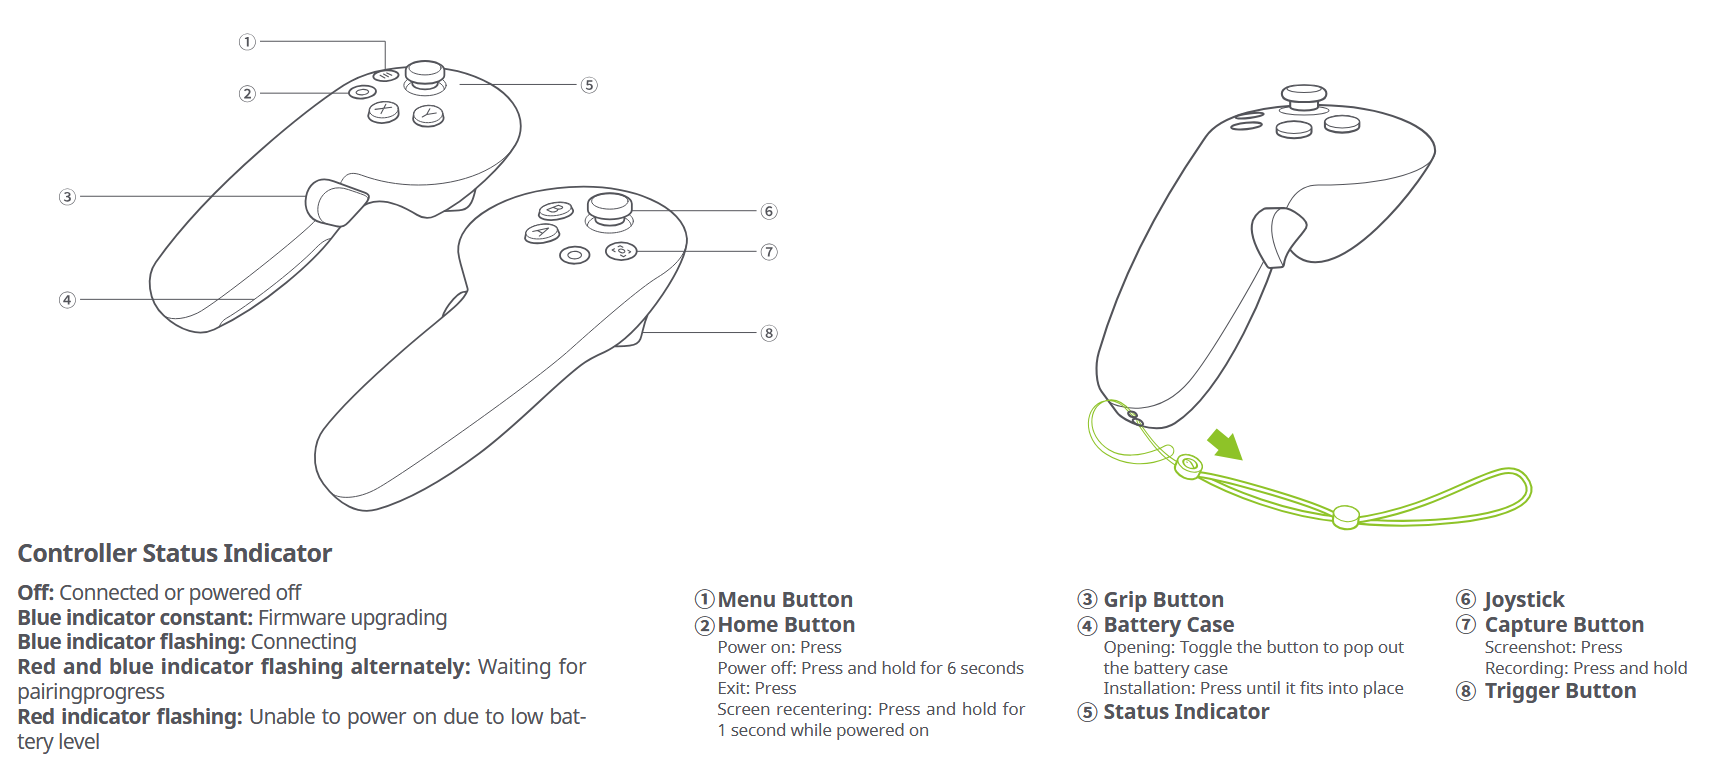
Home button (red circle on left controller)
| Function (per button) | Action |
|---|---|
| Home button (red circle on left controller) | |
| Power on | Short press. |
| Power off | Press and hold for 6 seconds. |
| Exit | Short press. |
| Screen re centering | Press and hold for 1 second while powered on. |
| Capture button (domed button on the right controller) | |
| Screenshot | Short press. |
| Recording | Press and hold 2 seconds to start recording. |
| Menu button (domed button on the left controller) | |
| XR Twin VR Menu | Short press (when streaming a simulation). |
| Return | Point to the target inner app window. Short press. |
| Y / B buttons | |
| Close inner app or window | Short press. |
Transferring screenshots and recordings#
Its easy to take screenshots and recordings with PICO 4 Ultra headset. Just press the Capture button on the right controller, or click Screen Shot in the inner Quick Settings menu.
Screenshots and recordings are stored in the headset. You can view them using the Photos inner app. The files are stored in All files > Pictures > Screenshots and All files > Movies > ScreenRecording folders, respectively (use the File Manager inner app).
To transfer files to a computer, first stop streaming and close PICO Business Streaming software. Then, disconnect-reconnect the USB cable. If a notification pops, click and select the action you want to execute (first connection). From your computer, you can use Microsoft Photo or File Explorer to transfer the files (look for PICO 4 Ultra Entreprise as an Android external device).
Windows Mixed Reality#
Produced by various manufacturers, Windows Mixed Reality headsets offer a range of options for VR experiences with features like inside-out tracking and comfortable design. SteamVR application required.
Find the installation and configuration instructions in the manufacturer's documentation.
Warning: Windows Mixed Reality no longer supported
Windows Mixed Reality devices are no longer supported by Windows since Windows 11, version 24H2 and later versions.