VR Menu
The VR Menu is a set of runtime tools offering design reviews features that can be accessed while playing a simulation in virtual reality with controllers. Open it by pressing the controller's Menu, X (left) or A (right) button (see controller bindings).
The VR menu contains two tabs: Toolbox and Settings.

Toolbox
To display the Toolbox tab:
- Open the VR Menu
- The Toolbox tab is displayed by default. If not, use the laser pointer to click on the Toolbox tab.

The Toolbox tab contains the following features:
| Functions | Description | |
|---|---|---|
| Cross section |  |
Create a cutting plane that is attached to the controller. Pull the trigger and move the plane; it will snap at 45° intervals. Release to drop. When you pull the trigger again, the cutting plane returns to your hand and you can move it again. |
| Photo |  |
Takes screenshots in VR. Frame your subject and pull the trigger. Screenshots will be stored in your Unity project: in the Project tab, find them in the Assets > Screenshots directory. |
| Marker |  |
Draw or write notes in VR. Pull the trigger and move the red dot. You can take a screenshot to keep a record. |
| Laser Grab |  |
Allow the VR user to grab objects from distance, using a laser. Point to the object you want to move. Pull the trigger to grab the object and move it. The object must be physicalized (rigid body) and it will move according to its degrees of freedom. |
| Measure |  |
The Measure tool allows you to measure the distance between two points snapped on objects. Mark the first position with the laser, pull the trigger to place the first point. Repeat to place the second point. A straight-line, the distance value and the delta values on each axis are displayed. The unit is the millimeter. Measurements are displayed until you select another tool. |
| Grab |  |
Allow the VR user to grab objects with the avatar's hands. Move your hand close enough and pull the trigger to grab the object. Grab is the default tool (that can be changed, see tip below) The object must be physicalized (rigid body) and it will move according to its degrees of freedom). |
| Puppet |  |
Click once to add an ergo-puppet in the scene (only if one does not already exist). See Ergonomic Puppet. |
| Reset Puppet |  |
Click once to reset the existing ergo-puppet to its default relax posture. Please note that you will lose its current posture (this cannot be undone). See Ergonomic Puppet. |
Cross section shader
In order to view the cross-section, materials need to use our custom Standard Triplanar with Cut shader. This is usually the case if you import your model through Pixyz plugin. If you need to section some Unity's primitives, replace its 'Default-Material' in the Mesh Renderer>Materials component.
Change default tool
You can change the default VR tool: In the Hierarchy tab select [Player_1] > VRMENU. In the Inspector tab, in the Mode Controller component, change the Starting Mode. Default: Grab.
Settings
To display the Settings tab:
- Open the VR Menu
- Use the laser pointer to click on the Settings tab.

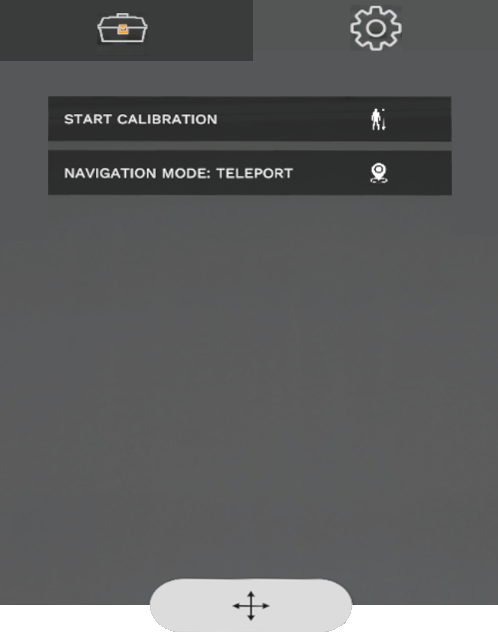
The Settings tab contains the following features:
Start Calibration
If you use the VR Headset+Controllers or VR Headset+Hand & Finger Tracking player, click to set the height of the avatar according to the current headset position (relative to device's floor reference). This way, your feet are back in contact with the ground.
If you use the Body Tracking player, restart the Body Tracking Calibration process. Read more on Body Tracking and Ergonomics with INTERACT.
Navigation mode
Click to switch from current Navigation mode to the next one. You can select successively in a loop: Teleport, Fly, Walk or Elevator. See Navigation.
Interaction with menu

To use the VR Menu, you must be in simulation (Unity Play mode) with a VR Headset player, and using controllers. Open the VR Menu by pressing the controller's 'menu' button (see controller bindings).
What about hand tracking ?
If you are using a VR Headset + Hand & Finger Tracking player, you are not currently using a controller. To access the VR Menu, briefly pick up a controller, just long enough to use the menu. Then, put the controller down to continue using your hands.
When open:
-
Orient one of your controllers towards the menu to engage the white laser pointer. Then point to an item and click on the controller's trigger. The tool remains activated until you select another one (except puppet buttons).
-
Using the bottom Move button will allow you to move the VR Menu around you and to release it where you want (see video below).
- You can switch hands currently using the tools. The other hand can be used to navigate, or retake control of the active feature.
Customize VR Menu
Learn how to customize VR Menu to your needs with your own custom functions with this tutorial: How to customize VR Menu.