VIVE Focus Vision headset
VIVE Focus Vision is a hybrid, VR headset that functions both as a standalone all-in-one XR device and a PC VR headset tethered wired or wirelessly to a PC to run SteamVR content for high-performance PC VR.
[HTC VIVE. VIVE Focus Vision – New standalone PC VR headset for gaming.
Retrieved February 23, 2026, from vive.com/us/product/vive-focus-vision/overview].
For product overview, visit vive.com/us/product/vive-focus-vision/overview
For product support, visit vive.com/us/support/focusvision
Prerequisites
- You will need:
- VIVE Focus Vision headset.
- VIVE Hub app with VIVE Streaming services installed on the computer.
- SteamVR app installed on the PC.
- HTC account. If you don't have one, you will be prompted to create one during the Focus Vision setup process.
- To connect the headset to a Wi-Fi network, it is highly recommended that you use a high-end, dedicated Wi-Fi router.
- For the best wired PC VR streaming experience, HTC VIVE recommend using the VIVE Wired Streaming Kit with VIVE Focus Vision. See vive.com/us/accessory/.
Install & Setup
- VIVE Hub
Install VIVE Hub. Download here. When asked, install the following services:
- VIVE Streaming.
- VIVE Ultimate Trackers [Optional, only if you are going to use them].
- VIVE Streaming
VIVE Streaming services are embedded in VIVE Hub. For manufacturer's recommendations, complete instructions and troubleshooting with VIVE Streaming:
- SteamVR
Install SteamVR. Use offline version (recommended) or download online version from Steam web site here (Steam account needed). Then launch it first time to complete the installation.
- VIVE Focus Vision
Set up your VIVE Focus Vision for the first time. For help, visit vive.com/us/setup/vive-focus-vision and vive.com/us/setup/vive-focus-vision/vr-setup. For connection instructions and diagnostics, go to the VIVE Hub window, open Settings > Setup Guide and follow the instructions.
Wired connection
When connecting your headset to your computer using a cable:
- Connect the headset to the computer. Start VIVE Hub and SteamVR.
-
Put on your headset. In Choose USB mode popup window:
- Select Take no action the first time you stream.
- When streaming in the future, select VIVE Streaming or VIVE Streaming (DP mode). If troubleshooting, try disconnecting and reconnecting the USB cable.
-
Go to Settings > Connectivity > Computer connection and select your computer.
- You are now waiting for INTERACT simulation under the SteamVR stellar dome.
For complete instructions, visit vive.com[...]howto/connecting-headset-to-computer-cable and vive.com[...]howto/connecting-vive-focus-to-pc-using-vive-wired-streaming-kit.
Wireless connection
When connecting your headset to your computer using a Wi-Fi network:
- Use a dedicated router (Wi-Fi 6+ recommended). Connect your computer directly to your router using an Ethernet cable.
- Start VIVE Hub.
- Put on your headset. Go to Settings > Connectivity > Wi-Fi and select the router network. Go to Settings > Connectivity > Computer connection and select your computer. Pair headset with your computer (Requested only during the first connection).
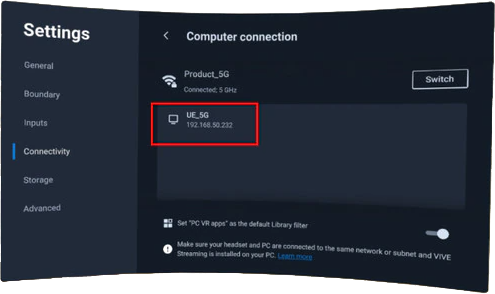
- In the VIVE Menu (below the Settings window), select Library (depending on the context, you will need to close the Computer connection page) and click SteamVR App thumbnail to start the streaming.
- You are now waiting for INTERACT simulation under the SteamVR stellar dome.
For manufacturer's recommendations, complete instructions and troubleshooting, visit vive.com[...]connecting-headset-to-computer-wireless.
Enable Hand Tracking
To enable the Focus Vision's hand tracking, from the headset Lobby go to VIVE menu > Settings > Inputs and turn on Hand tracking. If this option is turned off, you will need to use the controllers.
Learn more about Focus Vision context:
- Visit OTHER FEATURES AND TIPS section below.
- Discover Focus Vision useful features section below.
- Unity settings
Check OpenXR settings in Project Settings. To restore default settings, see OpenXR Settings.
When setup is complete and headset is connected, you can open your INTERACT project and start simulations.
OTHER FEATURES AND TIPS
Find here some useful features and tips.
Passthrough
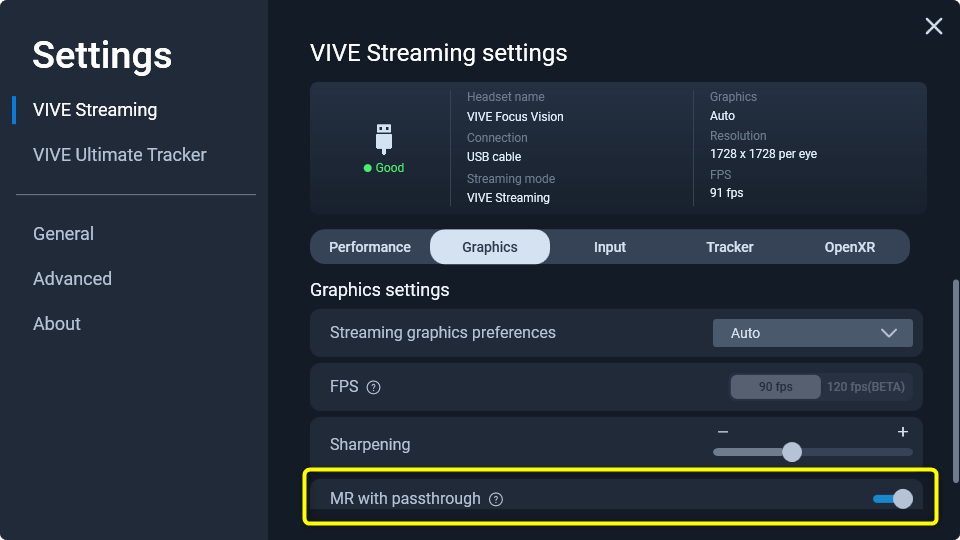
In your INTERACT VR simulation, you can cut out the background to see your scene objects in front of your real-life surroundings. This is named MR Passthrough.
In VIVE Hub:
- Go to Settings > VIVE Settings > VIVE Streaming settings > Graphics.
- Turn on MR with passthrough (scroll down to reveal).
In your INTERACT scene:
- Disable the Environment GameObject (Factory, Laboratory or Warehouse depending on the choice you made when creating your INTERACT simulation).
- Select [Player_1] and check you are using a VR headset player (see Display Device = HMD in Player Info component). If not, delete the existing player and add one.

- Go down the hierarchy until [Player_1] > Devices > Head and select Main Camera.
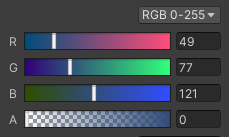
- From the Inspector panel, in Main Camera's Camera component,
- Turn Clear Flags to Solid Color.
- Click Background color.
- Regardless of color, make it fully transparent: set Alpha = 0.

- Switch to Unity Play mode to launch the simulation.
Info
See how to allow screenshots in passthrough mode.
Focus Vision useful features
The VIVE Focus Vision headset has features that are useful when you are immersed in an INTERACT VR simulation.
Screenshots and records
For complete instructions on taking screenshots and screen recordings, visit: vive.com[...]howto taking screenshots and videos.
Prerequisites
If Passthrough is used, in the headset menu, Settings > Advanced > Camera settings > Allow passthrough recording and casting is turned on.
Capture a screenshot
To take a screenshot, press VIVE + Trigger buttons on the right controller or Headset + Volume Down buttons simultaneously.
Record your screen
To start recording, either press VIVE + Grip buttons at the same time, or press Headset + Volume up buttons at the same time. Press them again to stop recording.
Transfer to PC
Screenshots and screen recordings are saved to the headset's Internal shared storage. You'll find screenshots in Pictures > Screenshots and screen recordings in Movies > Screenrecorder folders. You can transfer them to a storage card or computer:
- Connect the headset to the computer (use USB cable).
- Put on your headset and select File Transfer in Choose USB mode dialog box.
- you can take off your headset.
- On the computer, open a File Explorer and find VIVE Focus Vision as an Android external device.
- Navigate to the target folder (see above) and copy screenshots or screen records.
For complete instructions, visit vive.com[...]howto/transferring-screenshots-and-recordings-to-computer.
Cast
You can cast what you see in the headset to a web browser on a computer or a mobile device via Wi-Fi. It's a clever way to share your VR experience in real time or make a recording of it.
For complete instructions, visit vive.com[...]casting the headset to a browser.
Prerequisites
- Headset and computer or mobile device share the same Wi-Fi network.
- In the headset menu, Settings > Advanced > Camera settings > Allow passthrough recording and casting is turned on.
Casting the headset to a web browser
- On the headset,
- Open the VIVE menu (VIVE button on your right controller, or hand gesture).
- On the lower lectern, select Cast > Cast to browser.
- Note the IP address, formatted as: http://*[IP]*:8080/cast.
- On the computer or mobile device,
- Open a browser.
- Enter the same IP address.
- From Welcome page, click Connect.
- While viewing the VR screen in the browser, you can use the following controls:

(from left to right) Mute, Take a screenshot, Start/stop screen recording, Switch aspect ratio, Switch screen size. - To stop casting, click Disconnect in the browser or select Stop casting on your headset.
Passthrough shortcuts
For complete instructions to activate passthrough shortcuts and how switch this mode on or off, visit vive.com[...]howto/viewing-real-surroundings.
For basic Passthrough activation (view your surroundings instead of your VR scene):
- Either press the Headset button twice, press the VIVE button on your right controller twice.
- Press twice again to toggle back.
To display your VR objects in front of your real environment (AR/MR passthrough), see Passthrough settings in INTERACT tips section above.
Stop streaming
To stop streaming:
- Press the VIVE button on the right controller. This will display the VIVE Quick settings menu.
- From the Quick Settings menu, select Recent if an other option is current.
- From the Streaming app, either select Quit then Quit App or Back to Lobby.
You are in the VIVE Lobby.
Resume streaming
If streaming was interrupted, to resume and retrieve your INTERACT simulation:
- Put on your headset. You are in the VIVE Lobby.
- If displayed, close the Computer Connection window.
- From the VIVE Quick Setup menu, select Library if an other option is current.
- Top right, the Library filter must be set on PC (you can lock it).
- From PC Application page, click the SteamVR app and wait for reconnection.
- You are back in your INTERACT simulation!
Shut down
To shut down the headset and both controllers, either:
- Press the Headset button for a long time (4 seconds).
- In the popup window, select Shut Down.
- The headset shut down after a few seconds.
or,
- Press the battery button (rear right) for a long time (> 5 seconds).
Focus Vision tips
Turn on passthrough shortcut
Go to Settings > General and then turn on Passthrough shortcut. You can now turn passthrough mode on and off by quickly pressing the headset button or the VIVE button on the right controller twice.
Turn on hand tracking
To enable the Focus Vision's hand tracking , go to VIVE menu > Settings > Inputs and then turn on Hand tracking.
Connect a Wi-Fi network
To turn on Wi-Fi and select a network, go to Settings > Connectivity > Wi-Fi.
Change the duration for sleep mode
To change how long the headset stays awake before going into sleep mode, go to Settings > Advanced, and for Sleep Mode select Never or a more convenient duration.
Allow screenshots and recordings in Passthrough mode
Focus Vision protects your privacy. To unlock screenshots and recordings when Passthrough mode is enable in VIVE Hub > VIVE Streaming, from the headset menu go to Settings > Advanced > Camera settings and turn on Allow passthrough recording and casting option. See vive.com[...]howto taking screenshots and videos to learn more.
INTERACT tips
VR simulation using controllers
- Open the VIVE Menu. Click the VIVE button
 on the right controller to open the headset system VIVE Menu.
 - Open INTERACT's VR Menu. Click the Menu button
 on the left controller to open INTERACT VR Menu (see here for setup). Alternatively, you can also press X or A buttons. Click again to close.
 - Use your hands at any time. For your convenience, you can place both controllers on a flat surface and wait a few seconds for your headset to automatically switch to Hand Tracking manipulations. You may take your controllers back at any time.
VR simulation using hand tracking
-
Open the VIVE Menu. Face your right palm inward. When the VIVE symbol
appears, pinch your index finger and thumb together for 2 seconds until the validation ring fills up. The environment is stamped and the headset system VIVE Menu is displayed. Use the same gestures to close the VIVE Menu and resume simulation. -
Open INTERACT's VR Menu. Face your left or right palm inward. When the INTERACT Menu button appears, push with opposite finger to open the VR Menu. You can then use the laser to select an option or move the menu closer and tap option buttons with your hands.
- Use your controllers at any time. For your convenience, you can temporarily take your controllers for a walk or fly navigation or for use with other VR tools. Replace both controllers on a flat surface and wait a few seconds for your headset to automatically switch back to Hand Tracking mode.
VIVE Hub tip
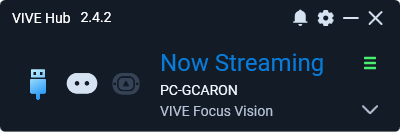
VIVE Hub window displays global performance and error information.
VIVE Streaming tips
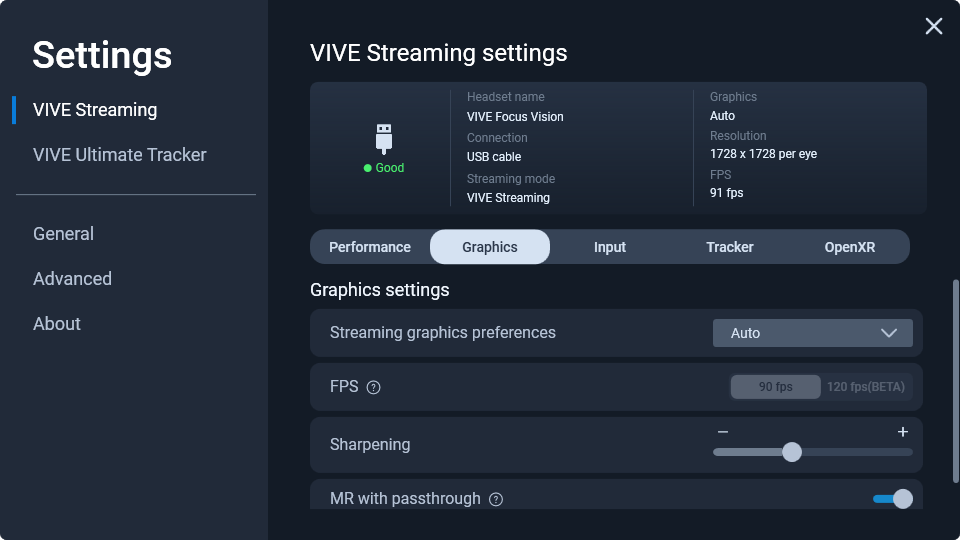
Display performance statistics
- From the VIVE Hub window, navigate to the VIVE Hub > Settings > VIVE Streaming.
- In the VIVE Streaming settings section you will find real time performance monitoring.
Set up left controller menu button to open the VR menu
Tip
By default, the standard left controller's menu button opens the SteamVR Settings menu. It may be more convenient to link this button to opening INTERACT's VR Menu during INTERACT simulations.
-
From the VIVE Hub window, navigate to the VIVE Hub > Settings > VIVE Streaming > VIVE Streaming settings section and select the Input tab.
-
In the Controller section, disable the Press
to open SteamVR dashboard option.
Activate MR with passthrough capabilities
- In the same section, select the Graphics tab.
- Turn "On" the MR with passthrough option. See Passthrough settings in your INTERACT project below.
Adapt performances
- In the same section, select the Performance tab.
- Feel free to explore the options for adapting VR performances.
SteamVR tips
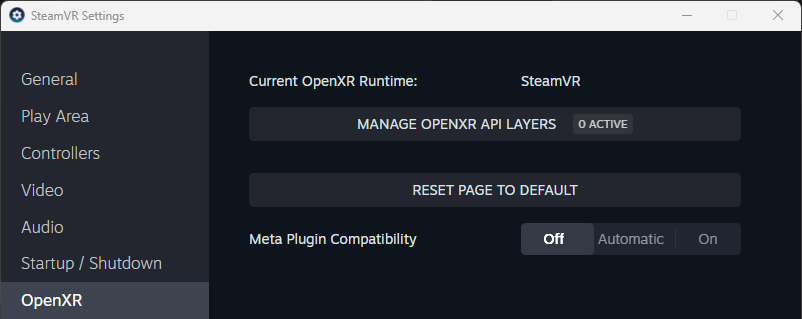
Check current Open XR Runtime
- From SteamVR burger menu
 , navigate to Settings > OpenXR.
 - Check if Current OpenXR Runtime is SteamVR. If not, click SET STEAMVR AS OPENXR RUNTIME button.
Manage OpenXR API Layers
- From SteamVR burger menu , navigate to Settings > OpenXR.
- Click MANAGE OPENXR API LAYERS button (see image above).
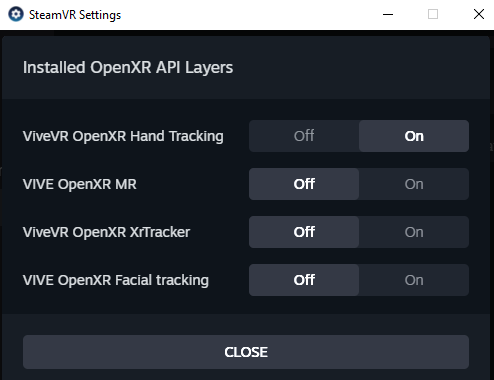
- In Installed OpenXR API Layers window, some unused layers can be turn "Off". For example:
- Turn Off VIVE OpenXR MR
- Turn Off VIVE OpenXR Facial tracking (LS GROUP have seen a significant impact on performance)
- Keep ViveVR OpenXR Hand Tracking layer "On" if you use hand tracking.
Tip
To learn more about installed API Layers, use OpenXR API Layers GUI. Download from GitHub here.
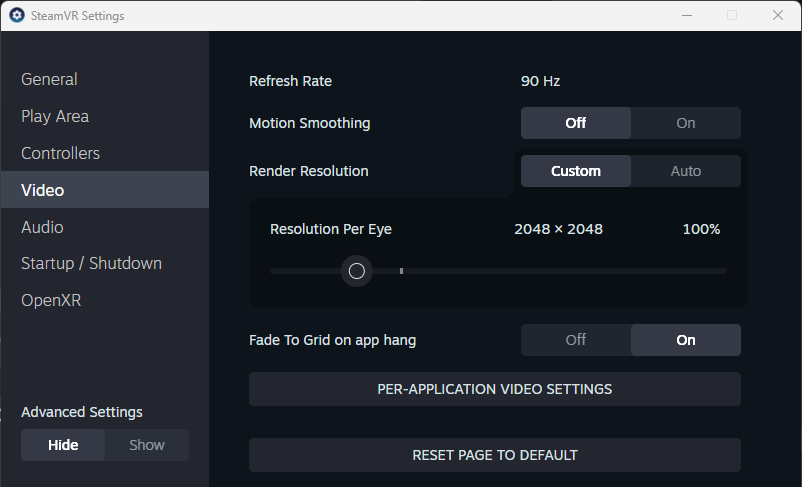
Manage the video resolution
- From SteamVR burger menu , navigate to Settings > Video.
- Set Render Resolution to Auto.
- If you prefer Custom, adjust the resolution. Start with 100%. A higher resolution will cost you performance.