How to setup your Varjo HMD with INTERACT ?
INTERACT is compatible with all OpenXR compatible Headsets. This way you can use your Varjo-XR3 HMD with INTERACT. Varjo is compatible with VIVE Base Station system, so you can use VIVE Controllers (SteamVR not needed).
Thanks to SteamVR, INTERACT can also use SteamVR-compatible devices. This allows you to use your Varjo XR-3 with five VIVE Trackers for a full body tracking experience.
You can find more documentation on this on Varjo website.
Install
- Download and install and open Varjo Base software.
- Follow instructions to connect headset to the adapter box and the adapter box to your graphic card Display ports (video) and USB ports (data).
- For inside-out or SteamVR tracking setups, see Varjo support Varjo support website.
Moving forward, we will assume that the headset and tracking system have been set up and tested.
Select your setup
Use Varjo with hand tracking
To use your Varjo XR3 for INTERACT VR simulation with hand tracking, follow these steps:
- Enable VIVE Base Stations if you use them for tracking.
- Connect Headset adapter box cables to PC computer and headset cables to the adapter box.
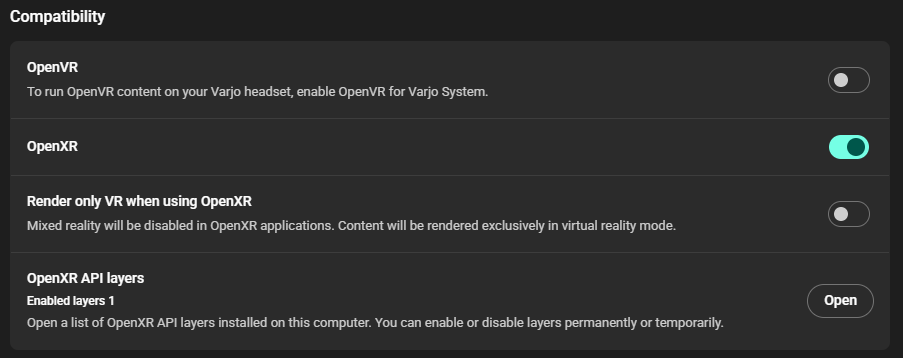
- Open your Varjo Base software and navigate to Settings > System > Compatibility. Disable OpenVR and enable OpenXR. The VarjoOpenXR runtime becomes the default one.
- Open SteamVR if you use it for tracking.
- Wait for the headset to connect in Varjo Base and SteamVR.
- Launch your INTERACT project. Use a VR headset player.
- When ready, click Play to switch to Unity runtime mode and begin streaming your simulation.
Since there are no VIVE Controllers, hand tracking works right away.
Use Varjo with VIVE Controllers
To use your Varjo XR3 headset for INTERACT VR simulation with VIVE Controllers, use same settings as for hand tracking (see above). In that case, you need to turn on the VIVE Base Stations and both VIVE Controllers and open SteamVR.
Base Stations and both VIVE Controllers are shown in the Varjo Base interface (top right). 
When VIVE Controllers are present, they control the avatar's gloves when you begin streaming your INTERACT VR simulation.
Use Varjo with VIVE Trackers
To use your Varjo XR3 headset and VIVE Controllers with 5 VIVE Trackers for full body tracking and ergonomics, follow these steps:
1. Varjo Base settings
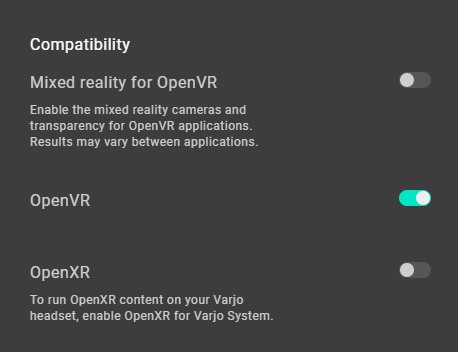
Open your Varjo Base software and navigate to Settings > System > Compatibility. Enable OpenVR and disable OpenXR.
2. SteamVR settings
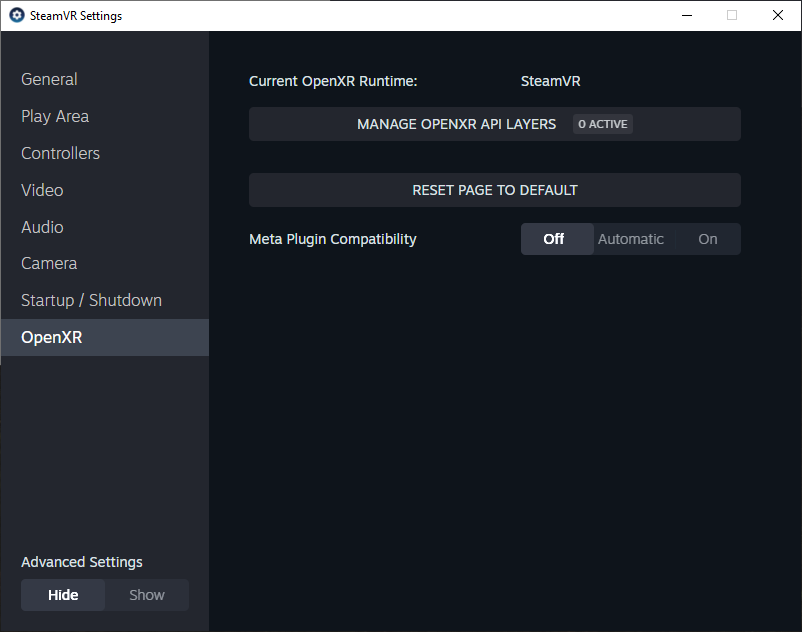
Open SteamVR and navigate to Settings > OpenXR:
- Check if Current OpenXR Runtime is set to SteamVR.
- If not, click SET STEAMVR AS OPENXR RUNTIME.
3. SteamVR VIVE Trackers settings
For first setup only:
- Connect headset, switch on your VIVE Controllers and supply the VIVE Base Stations.
- Open Varjo Base and SteamVR and check that headset, controllers and base stations are detected.
- Connect all 5 VIVE dongles to the computer (use a USB Hub).
- Switch on the Trackers one by one.
- Pair if the LED remains blue.
- Right-click the tracker icon and select Manage Trackers > MANAGE TRACKERS in SteamVR Settings.
- For each tracker, select corresponding role (LEFT & RIGHT ELBOW, LEFT & RIGHT KNEE, WAIST).
For subsequent start-ups:
- Switch all devices on and open Varjo Base and SteamVR.
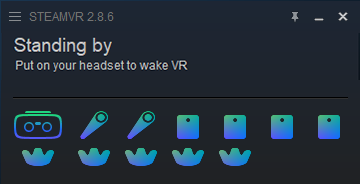
- Base Stations and both VIVE Controllers are shown in the Varjo Base interface (top right). The five VIVE Trackers are shown in the SteamVR dashboard (see image above).
- Open your INTERACT project.
- Add a VR Headset + Body Tracking player in your scene.
- You are ready to start. Switch to Unity Play mode and begin streaming your INTERACT VR simulation.
Avatar's gloves are controlled by the controllers, while the trackers control your body parts.
Unity Settings
Varjo Plugin is no longer necessary to launch your INTERACT simulation in VR.
MR Passthrough with Varjo
In your INTERACT VR simulation, you can cut out the background to see your scene objects in front of real-life surroundings. This is named MR Passthrough.
In your INTERACT scene:
- Disable the Environment GameObject (Factory, Laboratory or Warehouse depending on the choice you made when creating your INTERACT simulation).
- Select [Player_1] and check you are using a VR headset player (see Display Device = HMD in Player Info component). If not, delete the existing player and add one.

- Go down the hierarchy until [Player_1] > Devices > Head and select Main Camera.
- From the Inspector panel, in Main Camera's Camera component,
- Turn Clear Flags to Solid Color.
- Click Background color.
- Regardless of color, make it fully transparent: set Alpha = 0.

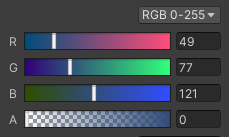
- Switch to Unity Play mode to launch the simulation.
Tips for Varjo
INTERACT usage tips with Varjo
VR using controllers
- Use a VR headset+Controllers player.
-
To open INTERACT's VR Menu, click the Menu button
 on the left or right controller. Alternatively, you can also press X or A buttons. Click again to close.
 -
Use your hands at any time. For your convenience, you can place both controllers on a flat surface and wait a few seconds for your headset to automatically switch to hand tracking manipulations. You may take your controllers back at any time.
VR using hand tracking
-
Use a VR headset+Hands&Finger Tracking player.
-
Open INTERACT's VR Menu. Face your left or right palm inward. When the INTERACT's Menu button appears, push with opposite finger to open the VR Menu. You can then use the laser to select an option or move the menu closer and tap option buttons with your hands.
-
Use your controllers at any time. When using Hand Tracking, for your convenience, you can temporarily take your controllers for a walk or fly navigation or for use with other VR tools. When finish, resume hand tracking.
- To resume hand tracking, put down both controllers on a flat surface and wait a few seconds for they enter in sleep mode and your headset to automatically switch back to Hand Tracking mode.
Varjo tips
Take a screenshot
From Varjo Base Headset tab, click Screenshot. The image files are stored on the PC computer in the Image > Varjo directory.
Record your screen
From Varjo Base Headset tab, click Record. The video files are stored on the PC computer in the Video > Varjo directory.
Open SteamVR
From Varjo Base Headset tab, click More > SteamVR to open the SteamVR dashboard.
Use controller as a mouse
From Varjo Base Settings tab, select Workspace in the left panel and enable Controller. You can now use your controller to click on the virtual desktop in the same way as you would with a mouse. For example, change some things in design mode and click Start from within the headset.